Photo Workshop
Photo Workshop https://www.linesonmaps.com/wp-content/uploads/2018/03/P9170045_web.jpg 1000 750 Michael Michael https://secure.gravatar.com/avatar/d30980ec39acb275922b1b6f9e3c5a60?s=96&d=wp_user_avatar&r=g- Michael
- no comments
“Your camera makes great pictures” This compliment has every amateur or professional photographer heard before and everyone hates it. There are no blanket rules for good pictures, but at least it makes it easier to learn how make them when you consider the 3 following.
- Your equipment does not have to be perfect, it has to be with you and you enjoy using it. If you have fun, the people in your pictures have fun and you can see that. When you have fun you try more and only by trying you will learn how your pictures work.
- Think, over image detail and position of the objects in the image, before you push the trigger. Both significantly determine the effect of the picture. A good picture is like a work of art, directing the viewer’s gaze from one detail to the next.
- Take the time to edit your pictures. During editing you think again about the effect of your pictures and you realize that another section or other arrangement would have improved the effect. Next time you know that. Finally during reworking, when look at the pictures you had no fun making them you notice you better save that time.
If you are currently photographing only with a mobile phone or a cheap compact camera, keep reading. Almost everything you will read here you can do with it and afterwards you can easily decide if a better camera makes sense for you.
The second rule is of course somewhat abstract, but it is the most important. The best camera only photocopys from where it is directed and also in post-processing you cannot create what was not photographed. There is great literature on the subject of image design, in which great pictures are included to understand what is meant. I prepared a few of my pictures in a similar way to give you an idea of what it’s about. This can only be learned with practice and self-reflection, which is why the third rule is so important. What always helps me to analyze a picture is, close my eyes and pay attention to how my eyes wander through the picture after opening. Even if you already know the picture, different views often result in several attempts. That sounds very difficult if you’ve never did it before, but with a bit of practice it quickly becomes intuitive.
Preferred Direction
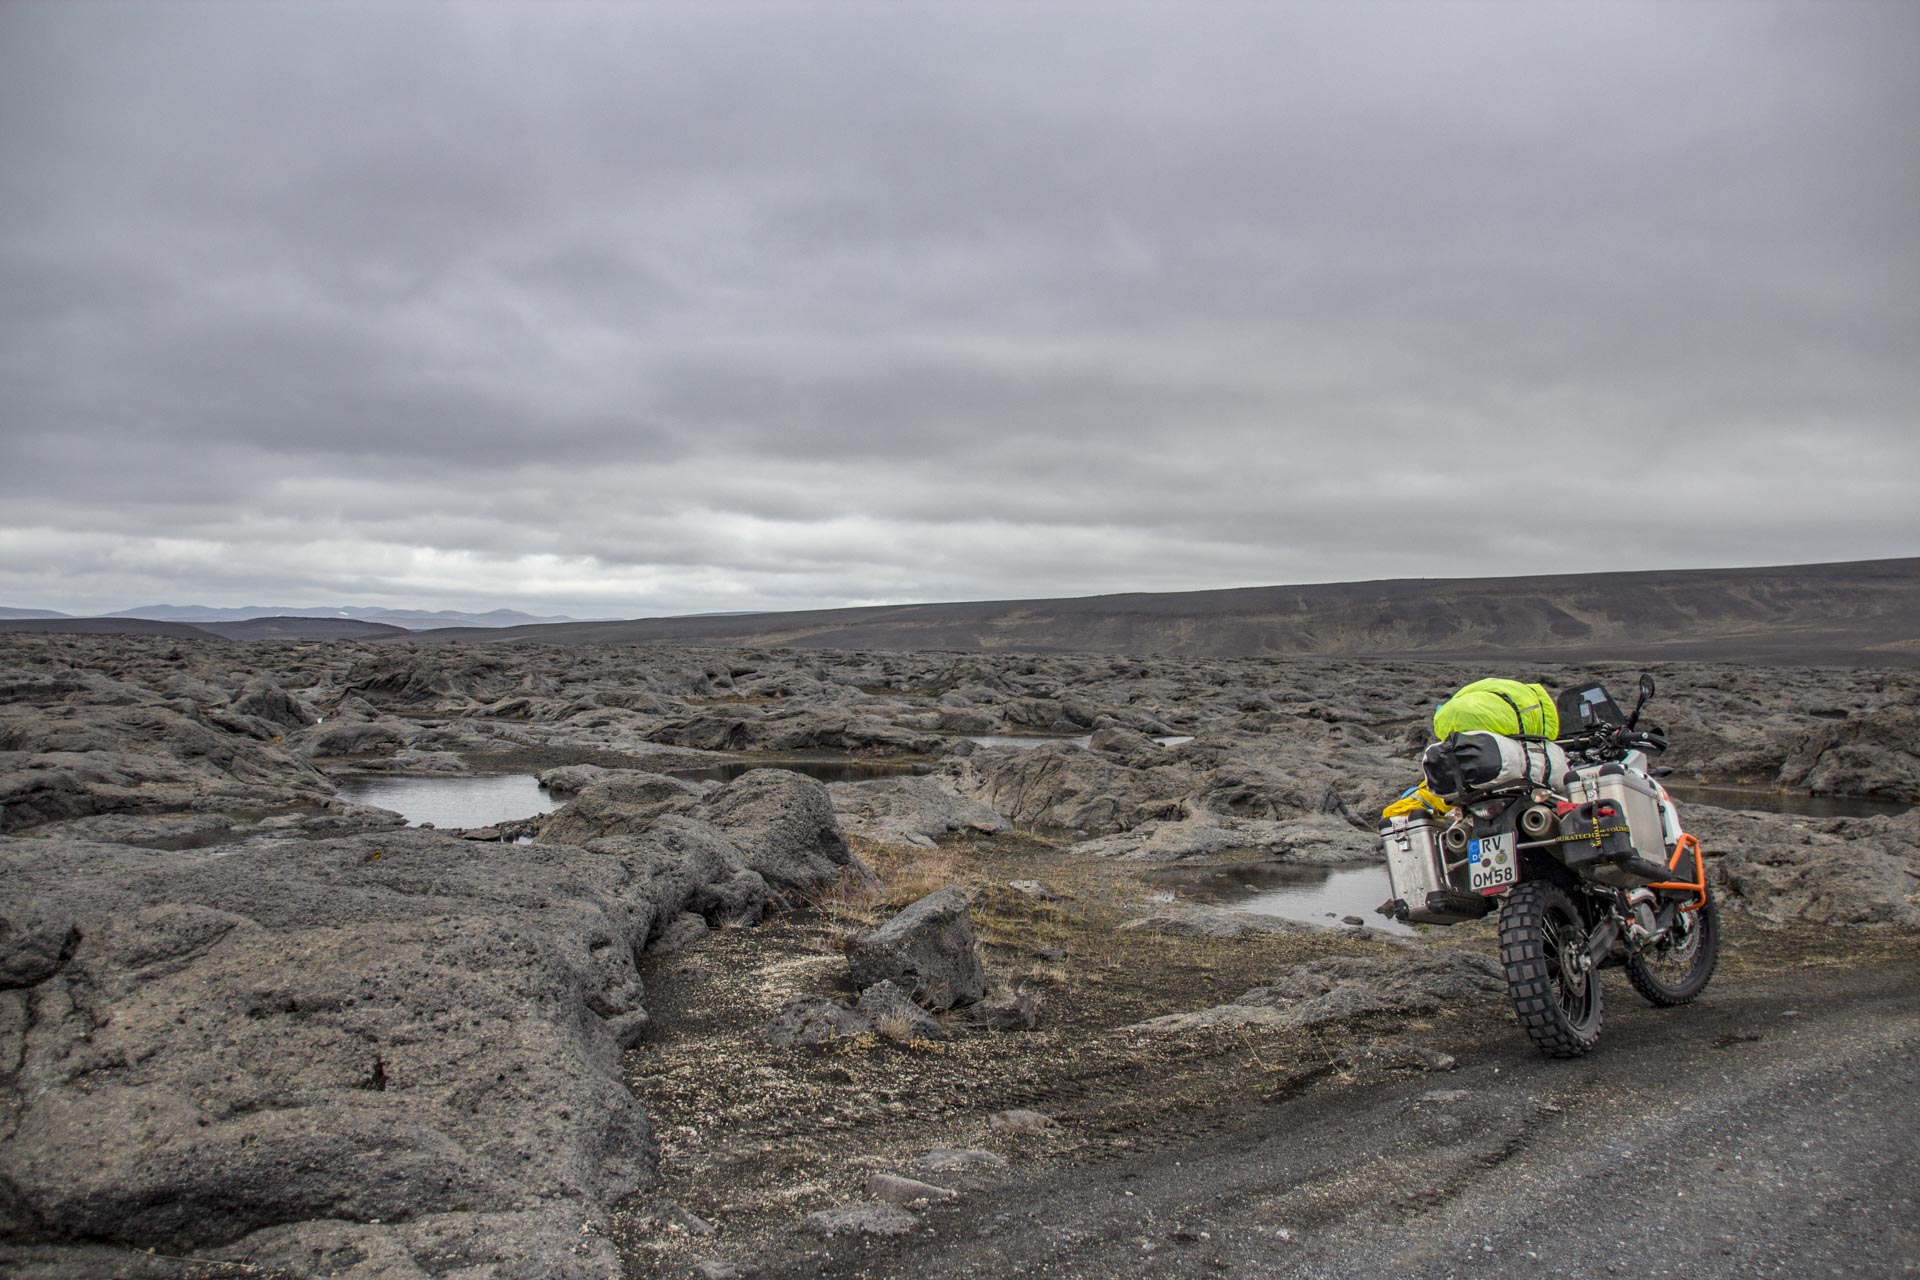
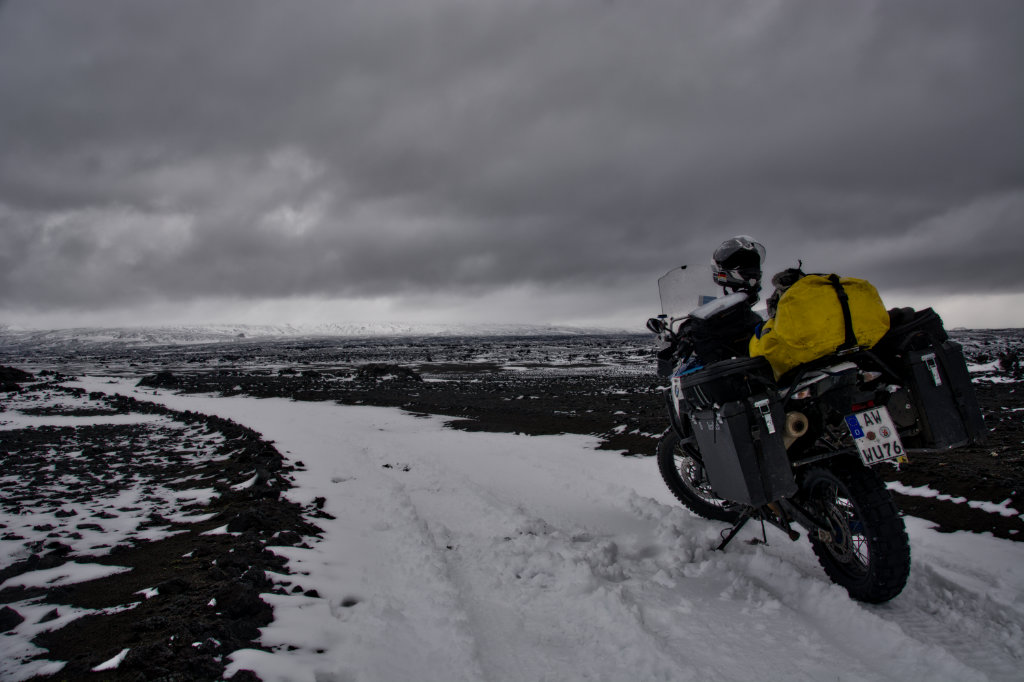
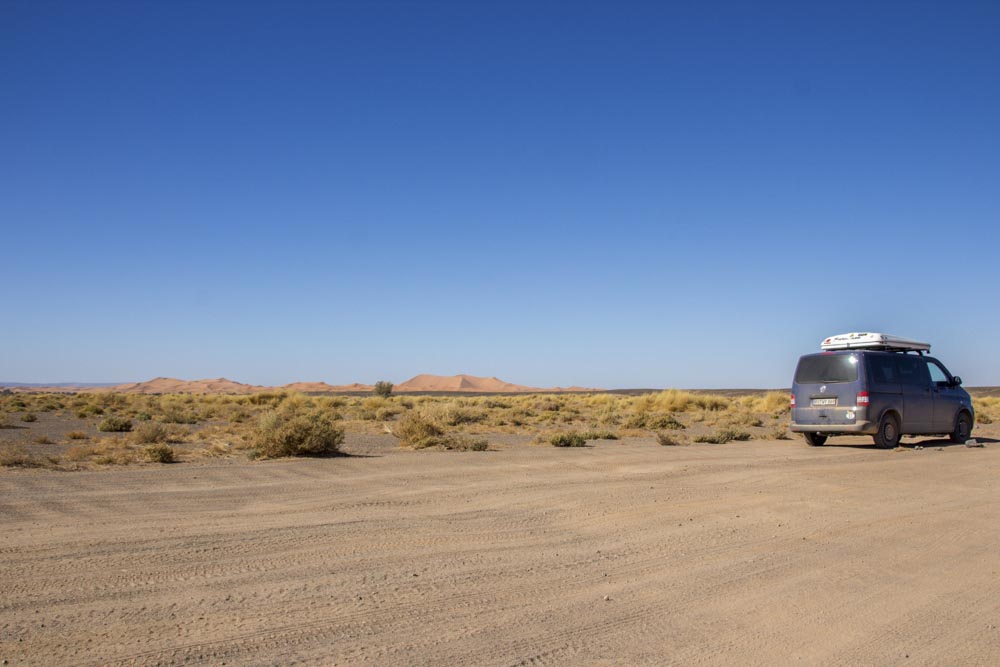
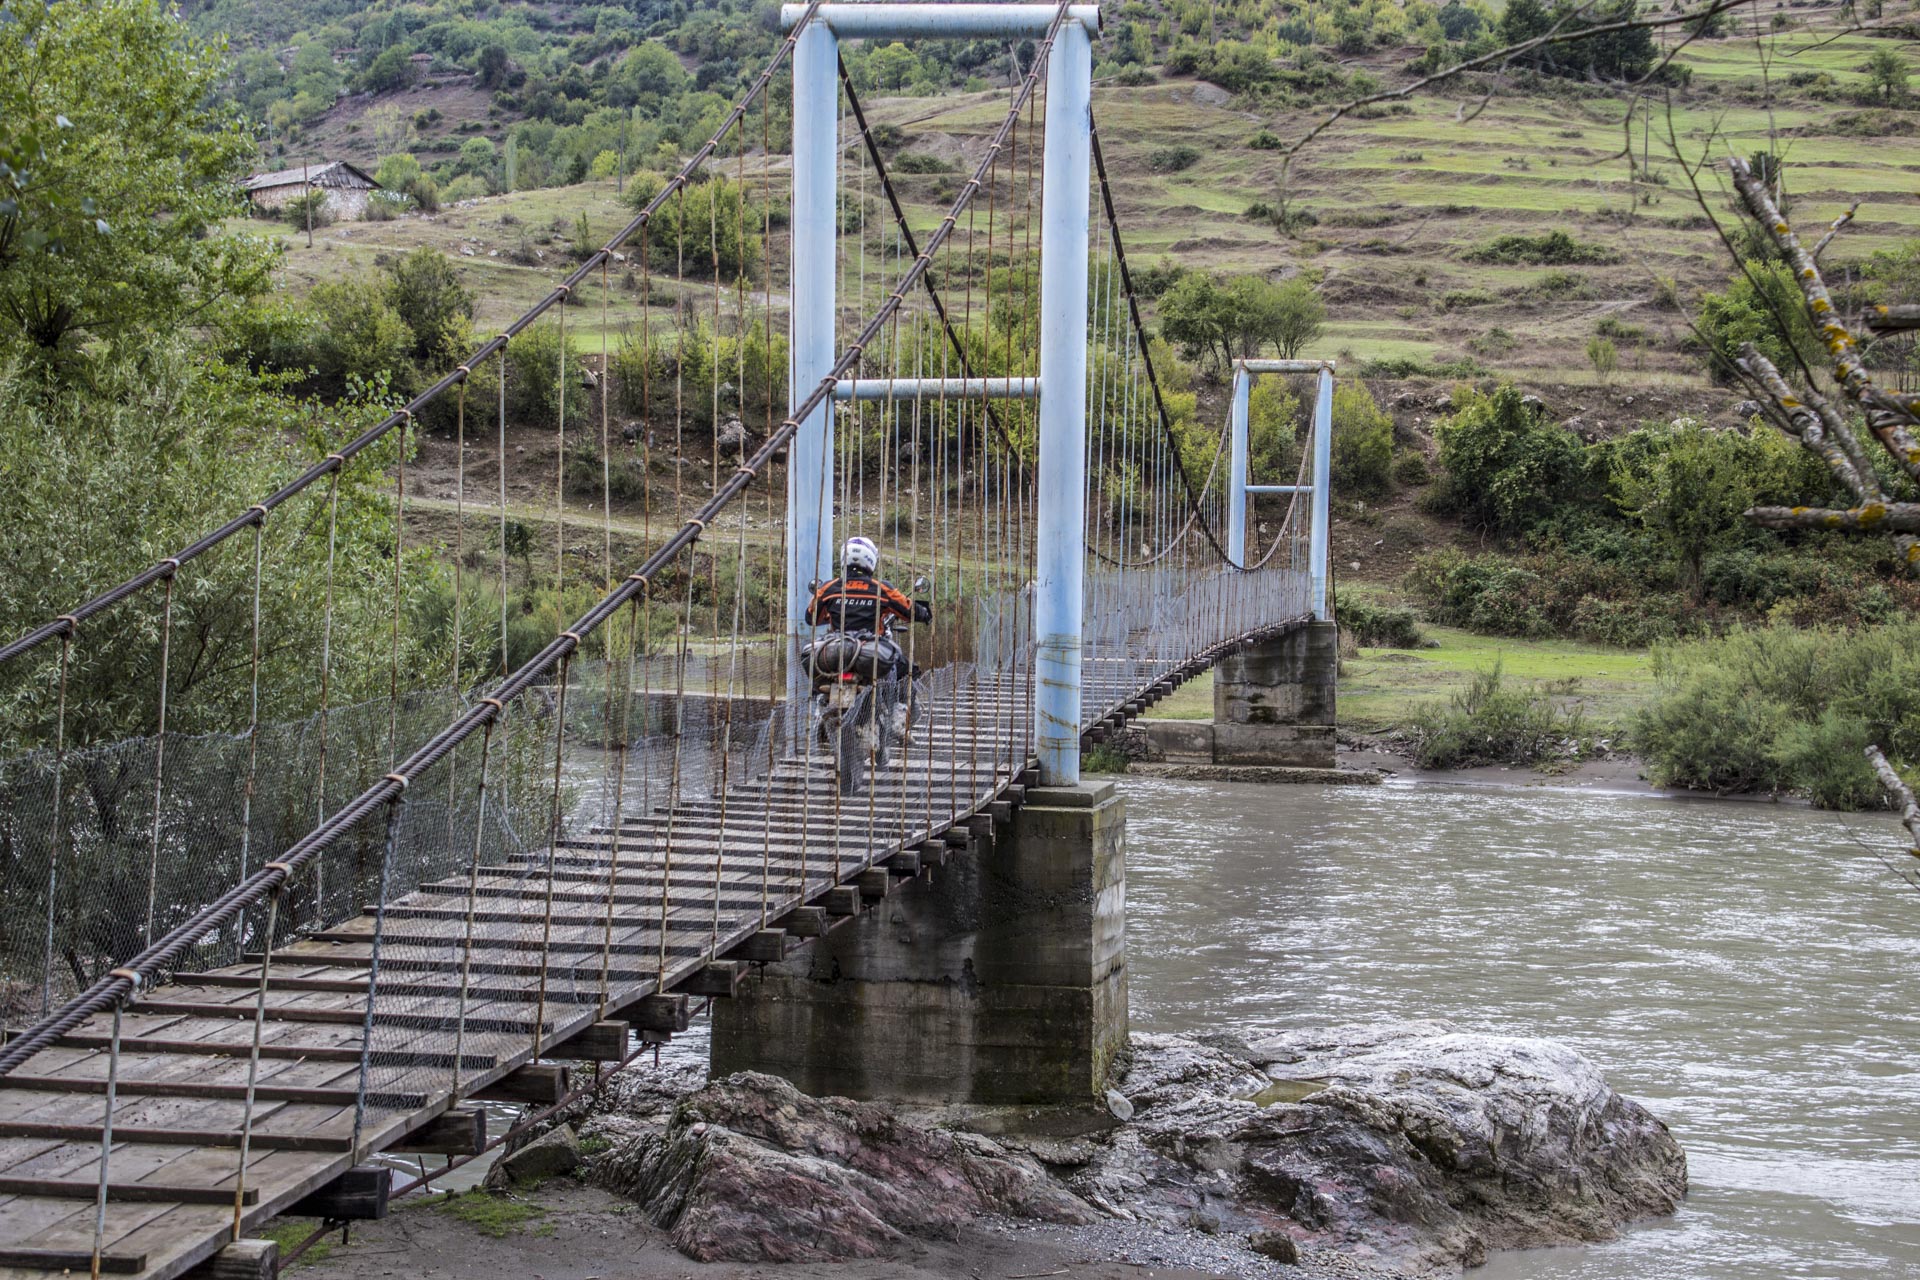
People, vehicles, animals and many other objects have a preferred direction. In this preferred direction the picture needs space. In this preferred direction one wants to look at the scene. The aim is to keep the view of the viewer as long as possible in the picture and not to divert his view from the picture.
Negativ Example
The view follows the short path and the direction of travel of the motorcycle. Whops your’re out of the picture and missed the breathtaking landscape next to it.
It would have been better to place the motorcycle in the picture with a view to the landscape to break the line of the way and to steer the view into the center.
Positiv Example
Again, the look intuitively follows the line that marks the path in the preferred direction of the motorcycle. The gaze wanders through the picture as if you had driven this way yourself. Brilliant Picture of Oliver.
Negativ Example
Again, the look intuitively follows the preferred direction of the vehicle and the earth road. Only after you have flown out of the picture you notice the blue sky and the desert landscape.
Better the car would have been placed on the left edge of the picture, the image a little further left so that the dunes can be seen further and the horizon line would have been more harmonious if it was deeper or significantly higher.
Positiv Example
The main rope or the bottom of the suspension bridge lead the view to the actual image object. Now dominates its preferred direction and the view follows the direction of the wobbly bridge.

Negativ Example
The front bird, which has got the bread, bounces off the edge of the picture. If the pursuer and the two ducks were in the lower right corner, it would be a much nicer picture of this chase.
Positiv Example
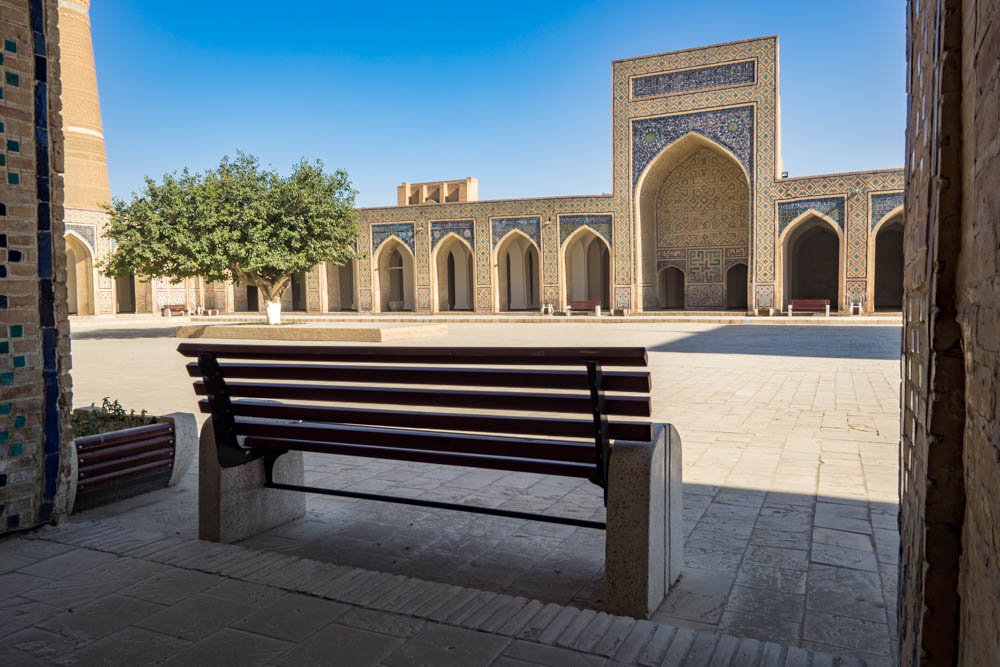
As mentioned, objects also have a preferred direction. This bank invites you with its view formally for a break in the shade.
Image Areas
Lines, surfaces and strong contrasts can divide your image into areas. The most common subdivision defines the horizon line with the areas sky and landscape. Are these balanced, the picture looks calm and rather boring. If you position these in a 2/3 to 1/3 ratio, the picture looks very harmonious and pleasant. On the other hand, with a ratio of 1/6 to 5/6 you can create more tension because you withhold the viewer from large parts of the image. With areas you can also lead the viewer to watch the image piece by piece.
Positiv Example
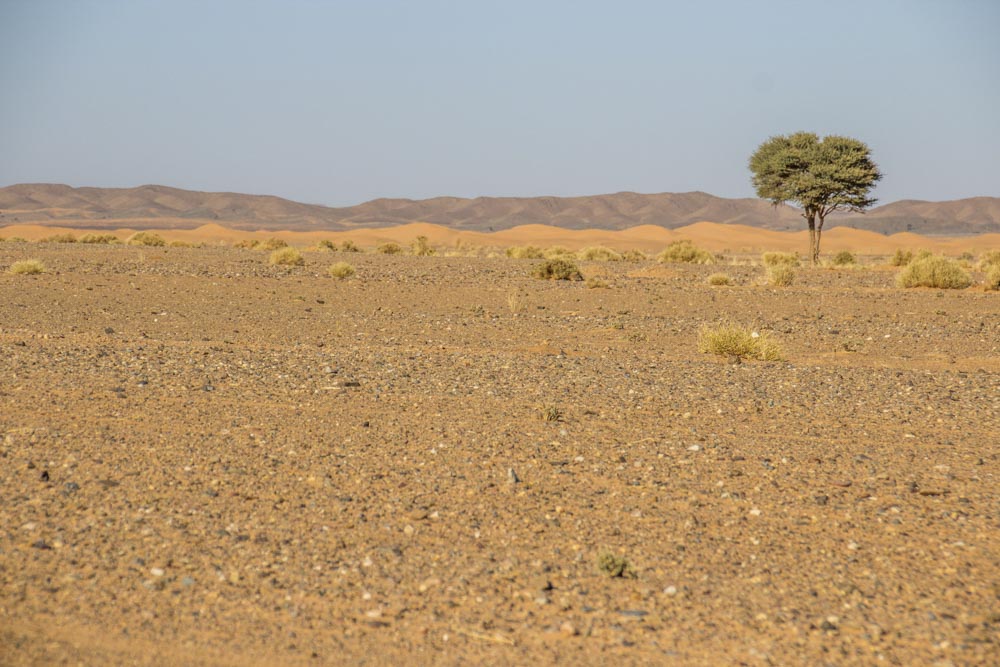
The horizon line is set very high up. The foreground is dominant and reflects well the expanse of the desert landscape. The single tree appears lost at the right edge of the picture and intensifies the mood of the wasteland.
Negativ Example
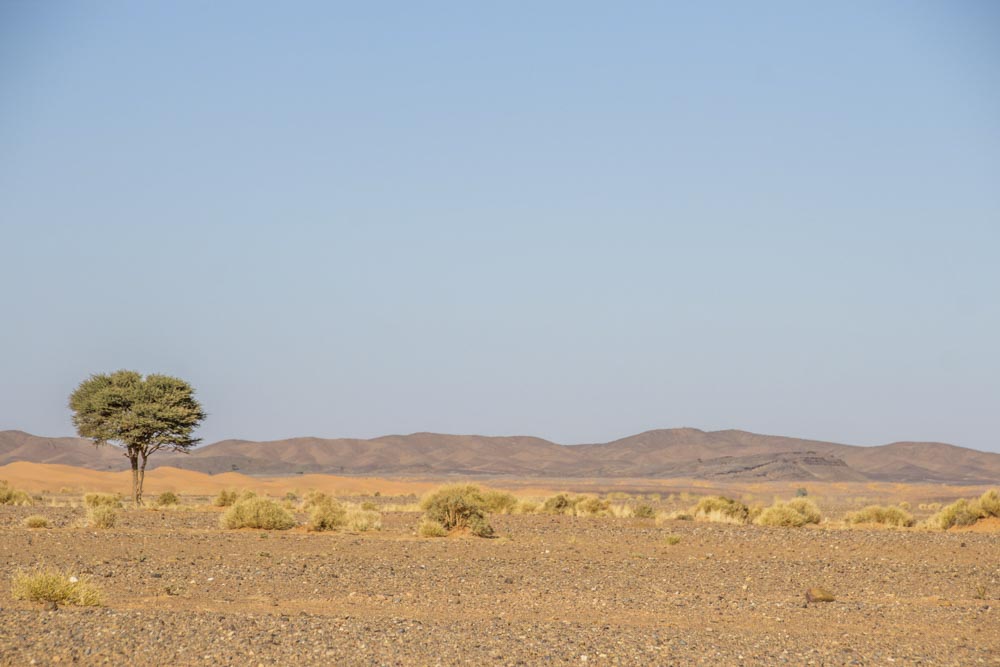
A similar effect is also possible if you set the horizon line low, but the landscape is no longer as bleak as before due to the now dominant blue sky. In both pictures you can see slightly darkened corners which are called vignetting. These occur most often in the wide-angle range with small focal length and can often be avoided with a larger aperture value. They can also be the result of mounted filters e.g. The UV filter that is often used for lens protection.
Positiv Example
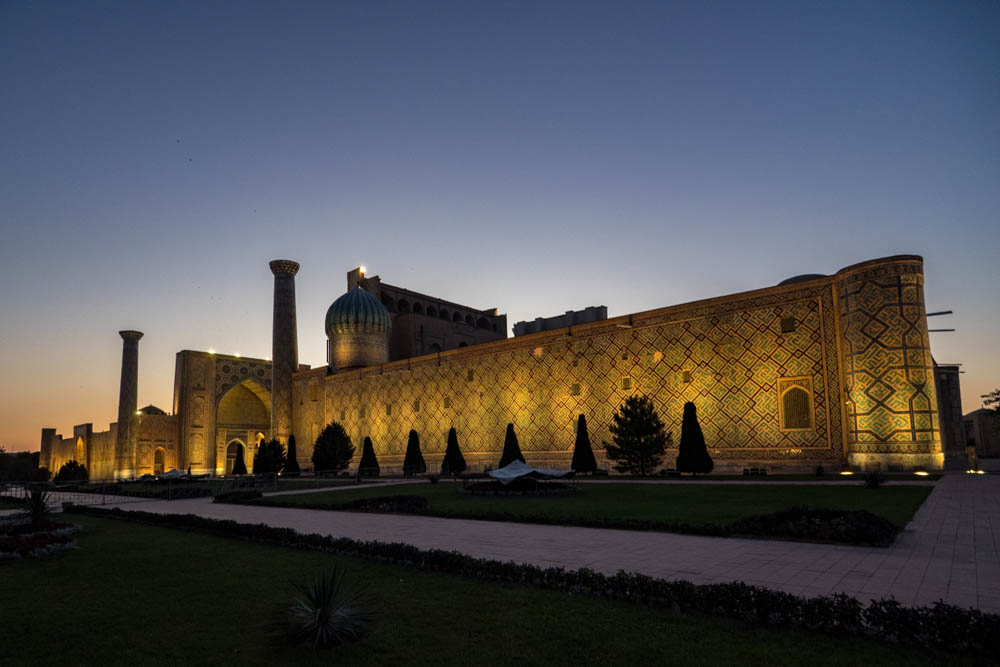
Between sky, building and park in the foreground, the contrast is very strong. Dominant is as desired the Registon Ensemble. If you have explored this, the view follows the paths of the park or the wonderful color gradient of the sky. In such pictures, one is often tempted to make everything similar in the post-processing eg. you could make the meadow quite green again but the effect of the picture would be lost.
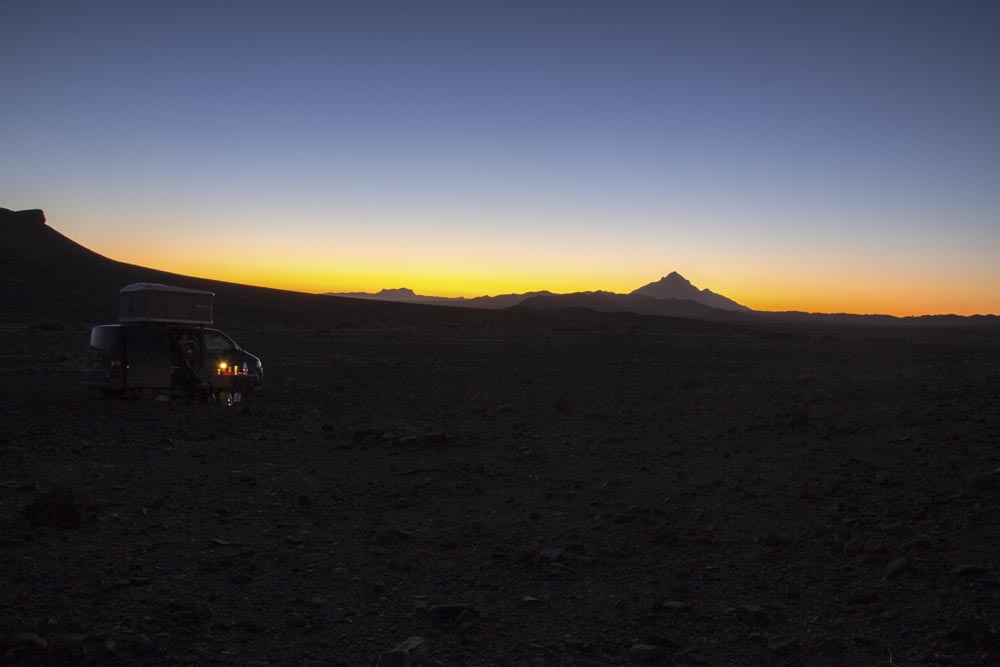
Negativ Examle
Again the contrast divides the picture into three levels. A night sky in dark blue, the dazzling streaks of the sunset highlighting the mountain silts and the deep black desert at night that is only lit by the light of the campsite lamp. The atmosphere of camping in the middle of the desert could have been better captured if the horizon line is a bit higher.
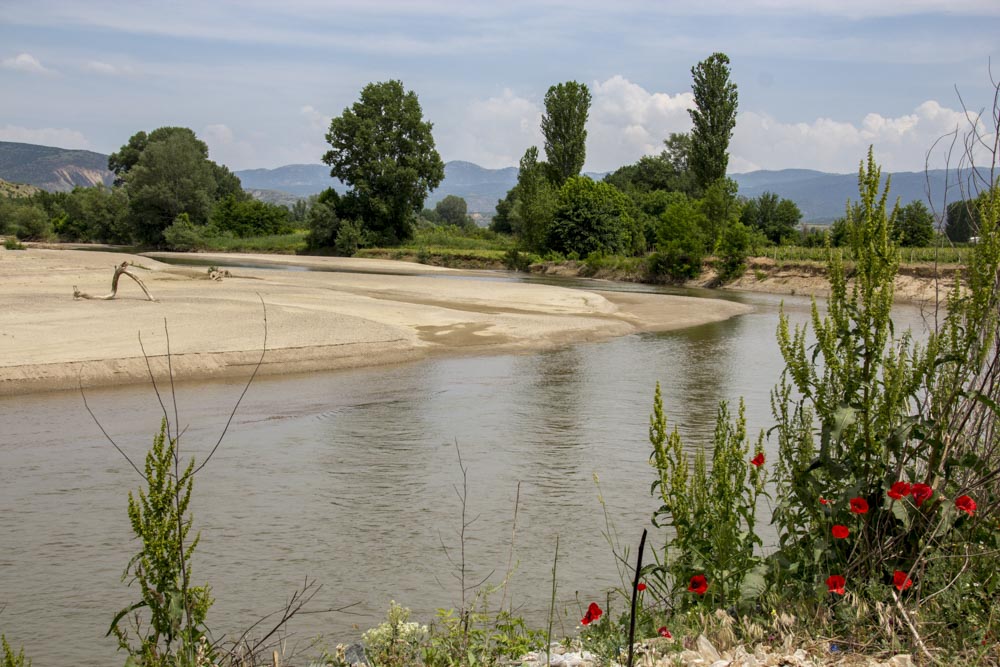
Positiv Example
The dividing element here is the river but also the color contrasts gives this picture several levels. First, the view is hangs on the bright red poppies in the right corner of the picture, looking out over the river, one explores the beach for driftwood and then follows the further course and then can not decide between the trees the sky or the mountain silts. But you don’t have to.
Perspective
Unusual perspectives can make completely banal things exciting. If a picture is taken at our usual eye height of about 1.6-1.8m something must be offered in the picture otherwise it is not worth to push the trigger.
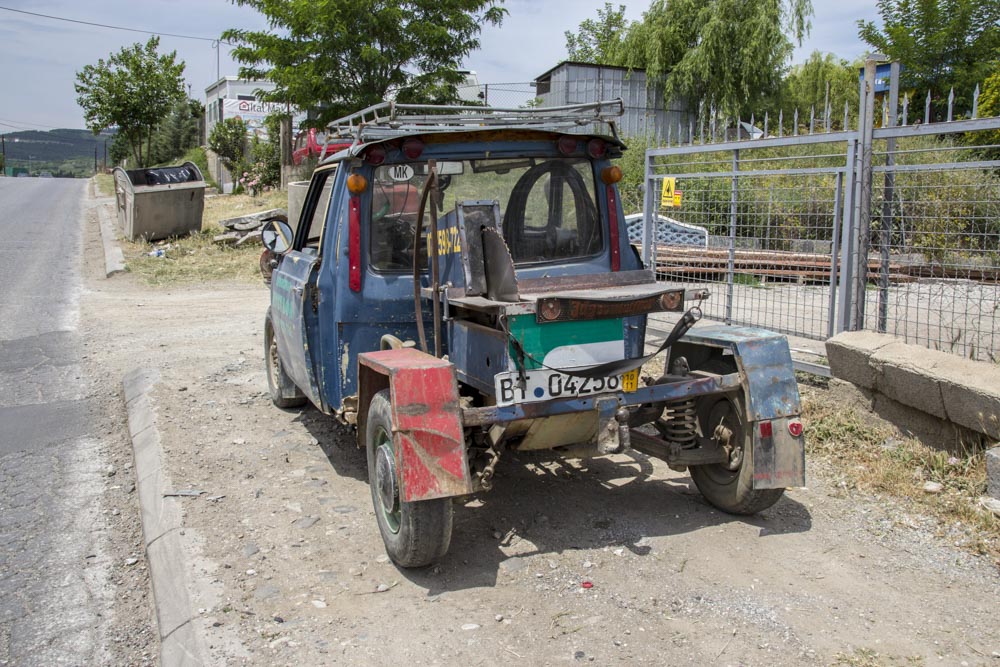
Negativ Example
The photo doesn’t show the fascination that I felt for this Macedonian circular saw car. Standing directly in front of it, the photo fulfills only a documentary purpose.
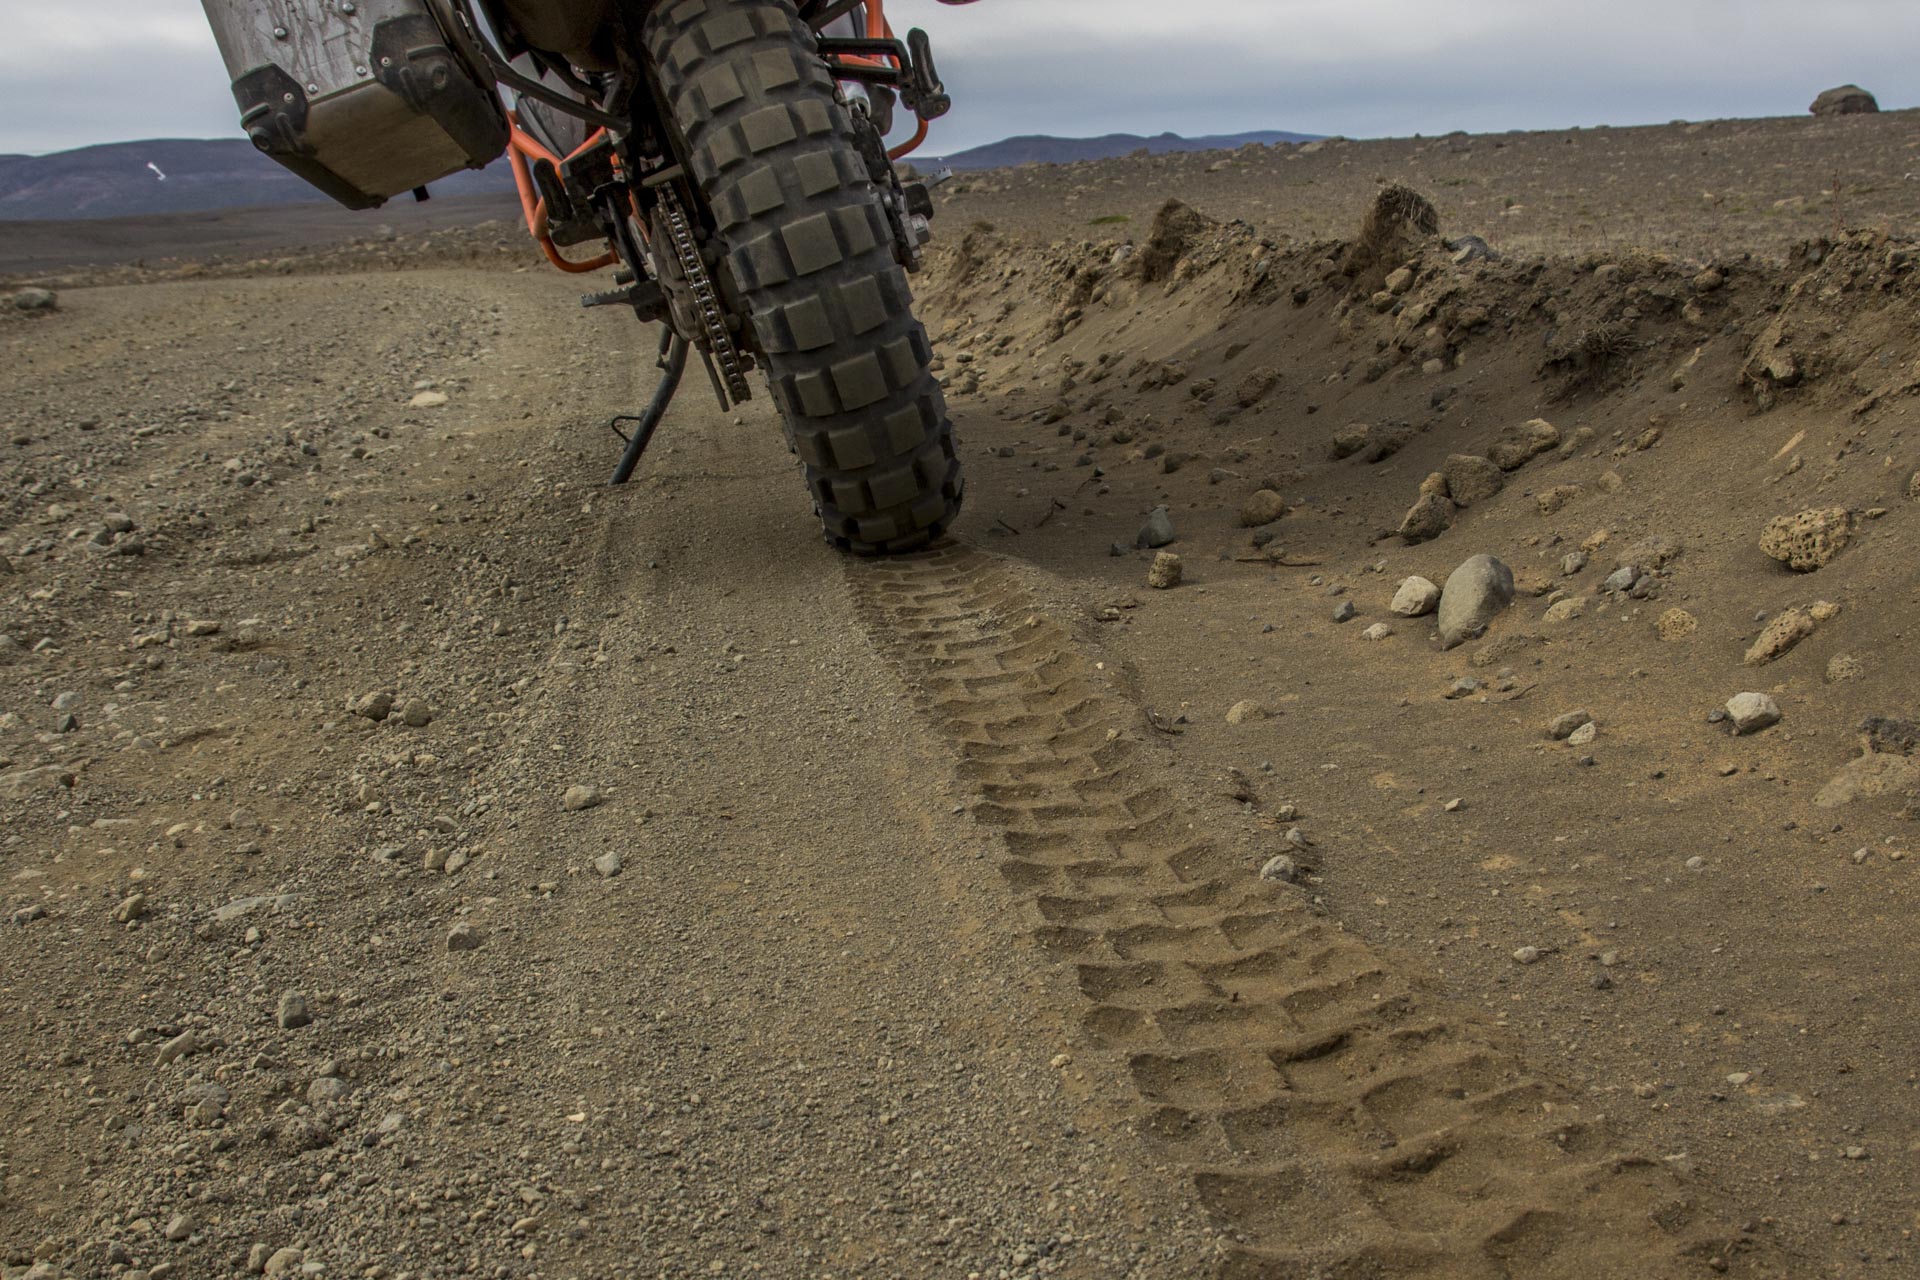
Positiv Example
The world from the perspective of a stone on the wayside. The tire track in the sand with so much detail looks much more interesting. Along the causative tire, the view screws upwards and either discovers the sky on the right or follows the street on the left out of the picture.
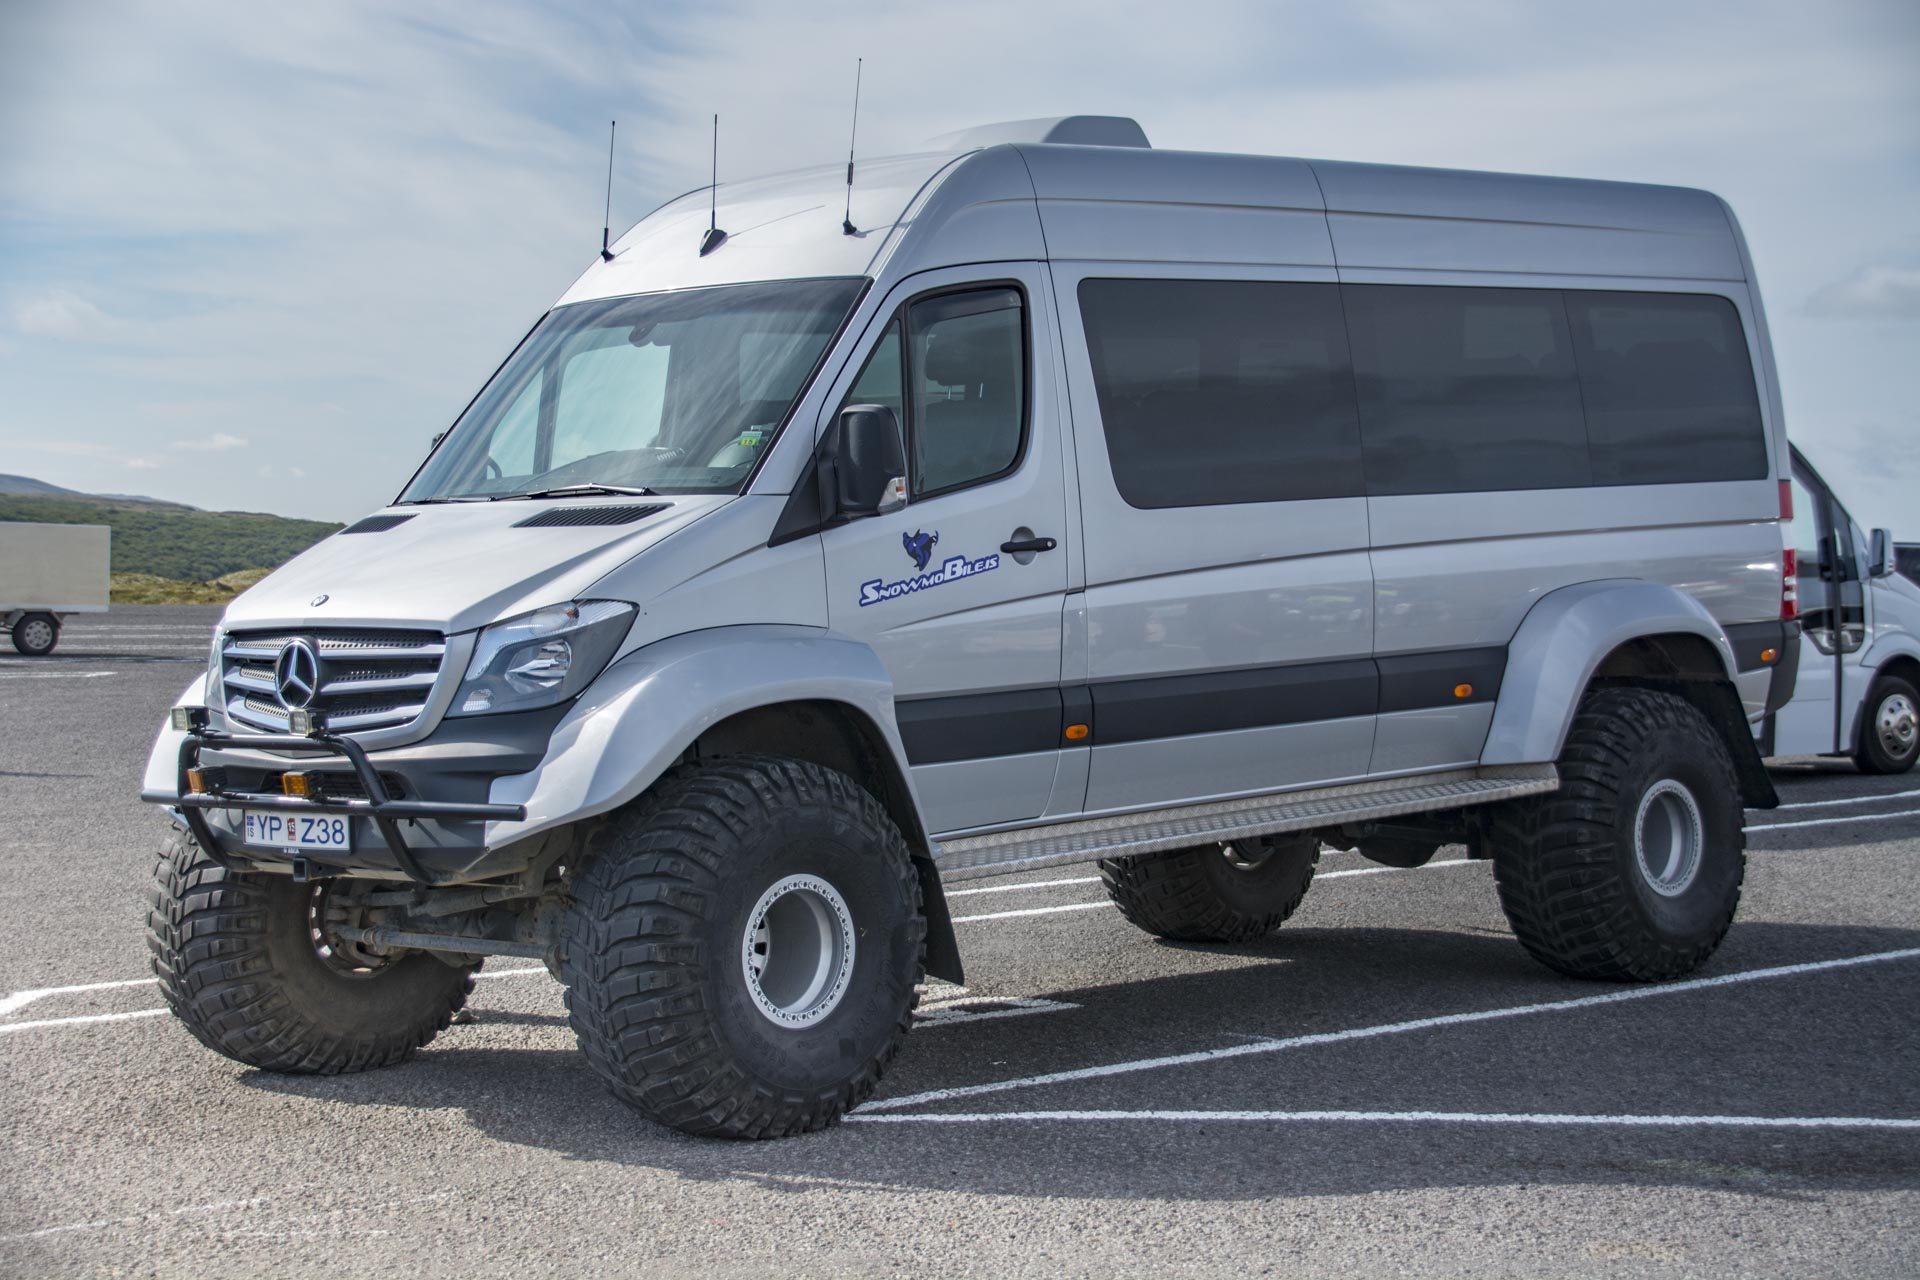
Negativ Example
The same mistake as with the circular saw car. It would have been better to ask someone to stand in front of the driver’s door for a better reference to size. The image should have been made on the level of the bumper from the ground. The tires and elevation would have been even more gigantic.
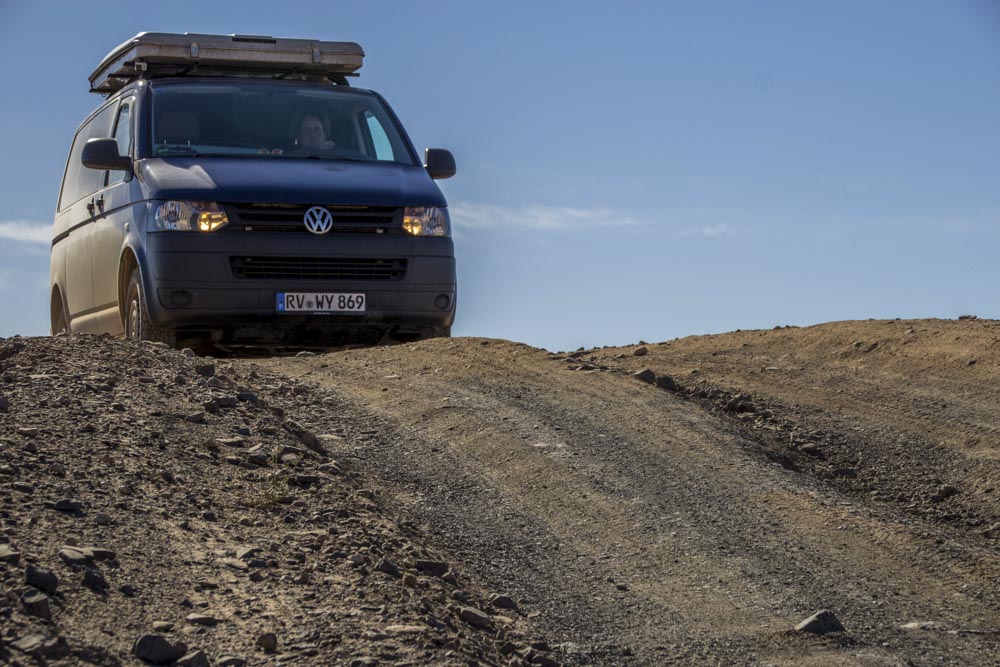
Positiv Example
The picture literally calls “Attention, I’m coming, out of my way otherwise I’ll overrun you!” And it’s a banal little hill. A bit deeper and with the car a few inches ahead, it would have worked even better.
If you want to delve deeper into the subject of image composing, you can, for example, Buy the book “Das Foto” (ISBN 9 783933 131799) by Harald Mante. It’s incredibly tough to read and the artistic touch really gets on the nerves of a pragmatist like me. But the great example pictures make the actual statement always easy to understand. Unfortunately, I have not read a second book on this subject and therefore can’t even call another one.
To put it simply, when photographing through a hole (the aperture), the light burns the image onto a medium or sensor. What comes out of it is determined by 3 parameters, the aperture value, the exposure time and the ISO sensitivity. In automatic mode, the camera sets all these values in such a way that usually a satisfying but no special picture comes out. So once you master the theme of image composing, it’s important to understand what those values mean to your images.
Small aperture values, such as F1.0 – F3.5 allow a lot of light to enter the camera and it can take even in low light still nice shots. However, a small aperture value also causes an image to focus only in a small area. In order to achieve a beautiful bokeh (the blur around the central image element) in portraits this is great, for group shots rather not. For this purpose, large aperture values are required such as F14-22 to get the whole picture sharp. Unfortunately, this leads to less light on the sensor and the shutter speed is longer. With slow shutter speeds (from the displayed value 30 = 1 / 30s), the image is blurred quickly and movements are blurred too. To see in it only one disadvantage is wrong in combination with a tripod you can also achieve beautiful effects with long shutter speeds (from the displayed value 1’= 1s) (smoothing water, removing moving objects, producing light trails and much more). However, if you want to capture moving objects sharply you need short shutter speeds (from the displayed value 150 = 1 / 150s). This can be achieved by increasing the ISO sensitivity (standard is usually ISO 100). Most cameras, however, start to rustle noticeably at high ISO values (from ISO 3200) and that usually the more the smaller their image sensor is. For this reason, large SLR cameras using the large full-frame and APS-C sensors have advantages in low light conditions compared to cell phones and compact cameras. In good light conditions, however, you often hardly notice a difference. The automatic mode juggles so always the 3 values aperture value, shutter speed and ISO sensitivity so that usually a useful compromise comes out. Especially if your camera warns you of over or under-exposed areas you will notice how often it is wrong. In these cases I like to use the exposure compensation. If you correct it in the direction of more or less light, the image is lightened or darkened using the free parameters of the selected camera modes. Basically, you can adjust these parameters manually even on mobile phones. However, more professional cameras often make settings easier with additional buttons.
I have ignored the focal length whose change allows the “zoom”. The standard lenses can usually be adjusted in a magnification of 1-3 => 3x zoom. Travel lenses make it similar to the so-called Super Zoom or Megazoom cameras on zoom factors of 10-20. Large zoom factors are often connected with disadvantages in terms of image sharpness and aperture. This is most obvious with fixed focal lengths, most are built with aperture values F1.0-1.8. While you hardly find a travel lenses whose smallest aperture value does not start at F3.5 and worsens depending on the zoom level on F6.3. This is also the real reason why there are system cameras with interchangeable lenses. Due to the design, every lens makes compromises somewhere.
Dear professionals, I am aware that I have generalized and simplified a lot. It was important for me to introduce beginners and cell phone photographers why it is attractive to play with these parameters at all. Anyone who wants to deal with the complete theory will find better websites anyway or should rather read dedicated books or a book to his camera. I have chosen to my Olympus the book ” Kreativ Fotografieren mit Olympus OM-D E-M1″ (ISBN 9 783864 901713) by Markus Wäger and can highly recommend it. Markus Wäger has also written books on other cameras and topics. His ” Die kreative Fotoschule ” (ISBN 9 783836 234658) is certainly a very interesting book for beginners in which from camera selection to image editing everything is roughly explained.
Depth of Focus and Bokeh
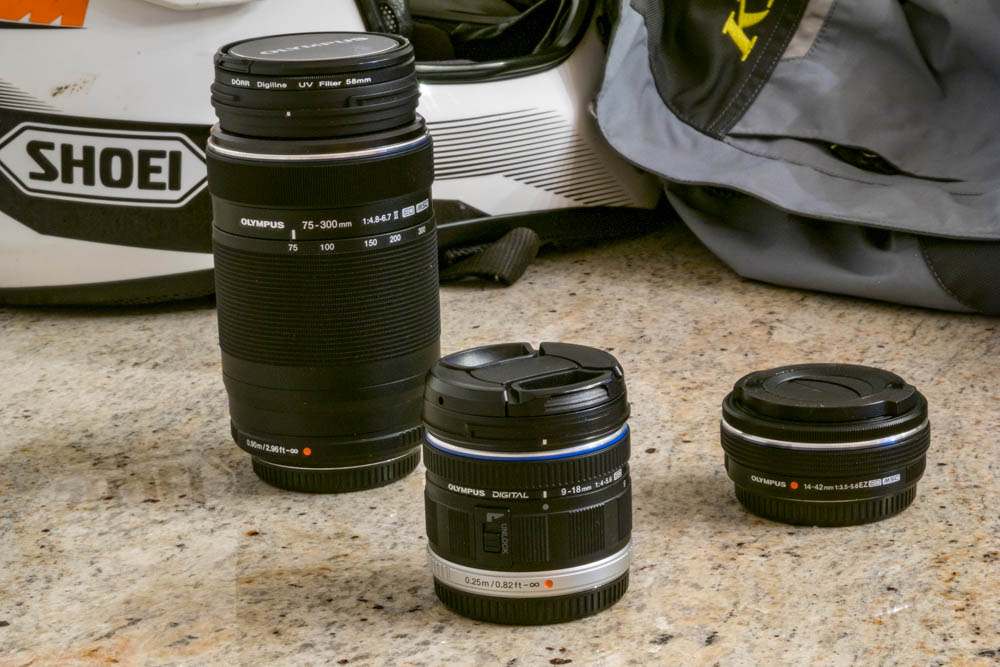
large aperture value => high depth of focus
Large aperture value means the aperture or the opening for the light is smaller. That means less light can enter but all image planes are sharp. The lenses in the foreground, the lettering on the helmet, the writing on the jacket. Decisive for the effect in the example is the aperture of F22 the secondary parameters are exposure time 25s and ISO200 could be also set by the automatic => aperture priority (Letter A on Modewheel)
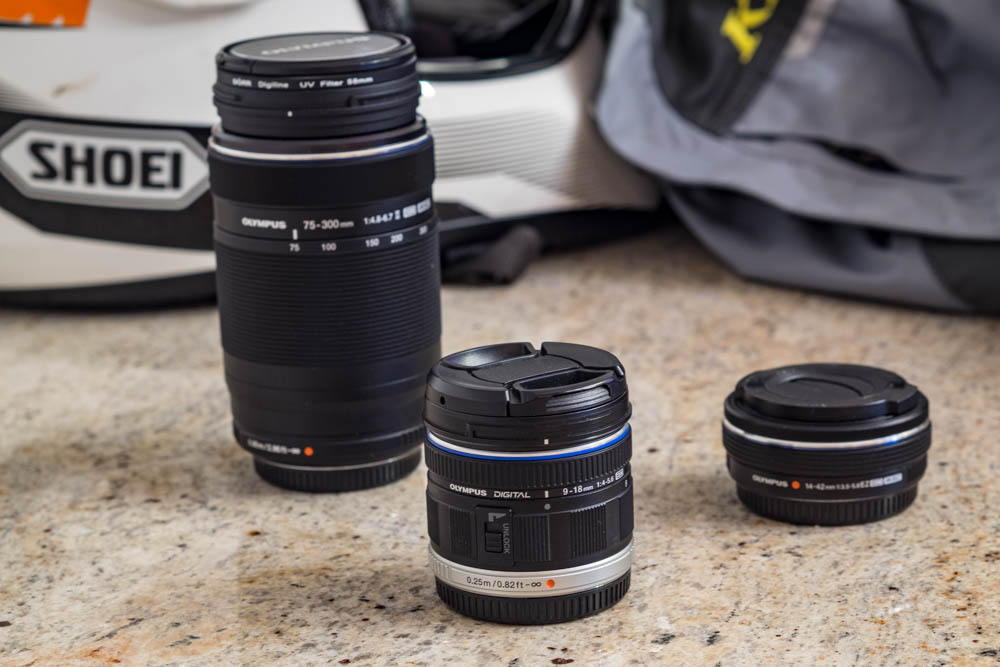
medium aperture value => medium depth of focus
If you reduce the aperture value, you can observe how the depth of field becomes less. In the rear image planes the lettering on helmet and jacket are out of focus, the middle plane of the large telephoto lens and the small pancake can still be seen. The parameters are aperture F5.6, exposure time 1.6s and ISO200. Because they are static objects and I had to use a tripod anyway, I have held the ISO value. The jump of the shutter speed from 25s to 1.6s shows how much the amount of light depends on the aperture.
small aperture value => small depth of focus
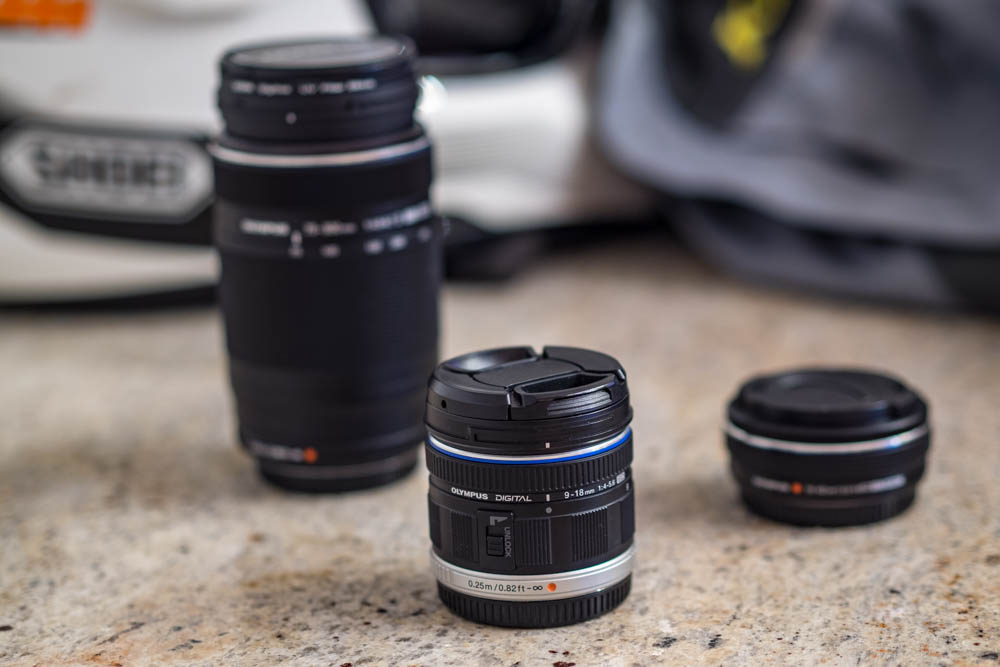
Small aperture values are double-edged. You can see clearly that only the wide-angle lens is sharp in the front. At the same time, however, it looks sublime from the background, it is referred to as an exemption, the background becomes a bokeh. The parameters are Aperture F1.8, exposure time 1 / 6s and ISO200. If you take pictures in automatic mode, the camera will set the aperture values as low as possible in bad light to avoid the noise of high ISO values. In other words, you have to pay attention to the correct focus point better than in good light. In good light, an automatic system tends to large aperture values to cover up the focus errors of the autofocus better.
small aperture value => small depth of focus
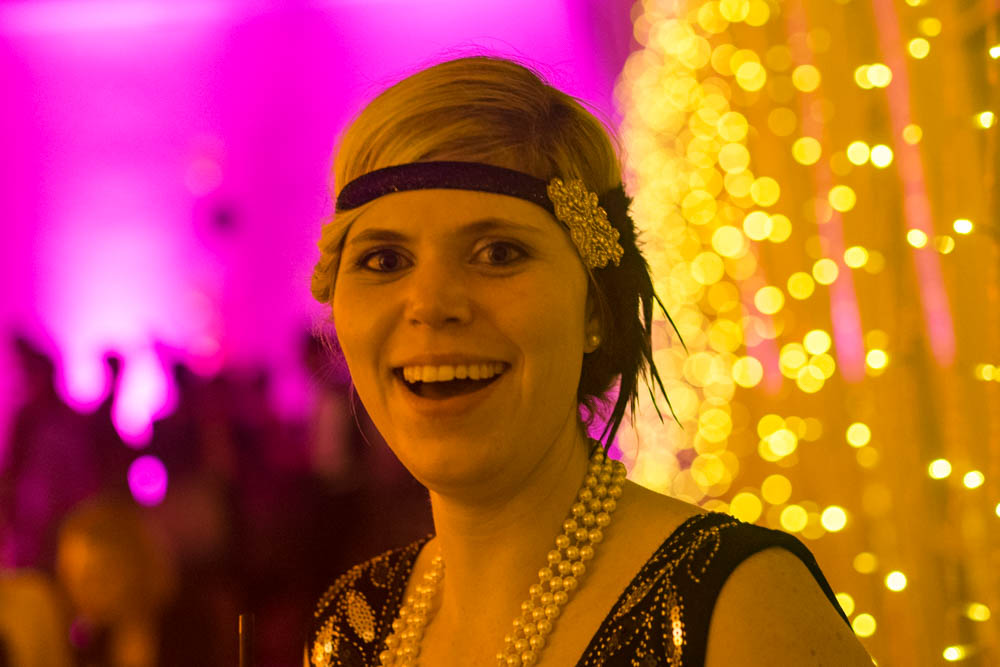
The bokeh does not depend on the aperture value alone. The further background and the object to be exposed away from each other, the stronger the effect and the larger the aperture value can be. Practically usable is it only with fixed focal lengths or high-quality zoom lenses with smaller aperture values than F2.8. In the background a great lighting as in the example it blur circles will arise. The parameters are Aperture F1.8, exposure time 1 / 100s and ISO800.
Long and short exposure
Short Exposure
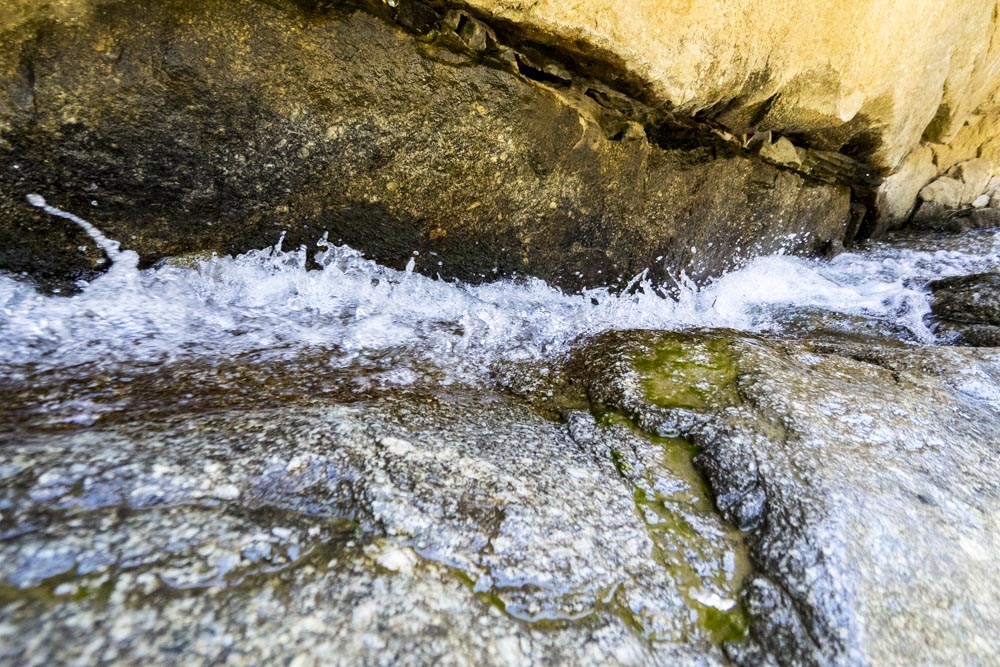
With short exposure times, movements can be frozen. Everything that goes in the direction of action and sports photography does not come around short exposure times. The easiest way to achieve good results is to increase the ISO value in the automatic program. Decisive for the effect in the example is the length of the shutter speed 1/500 the secondary parameters Aperture F4 and ISO1600 you can also set by the automatic => shutter priority (Letter S or T=Time Value on Modewheel)
Long Exposure
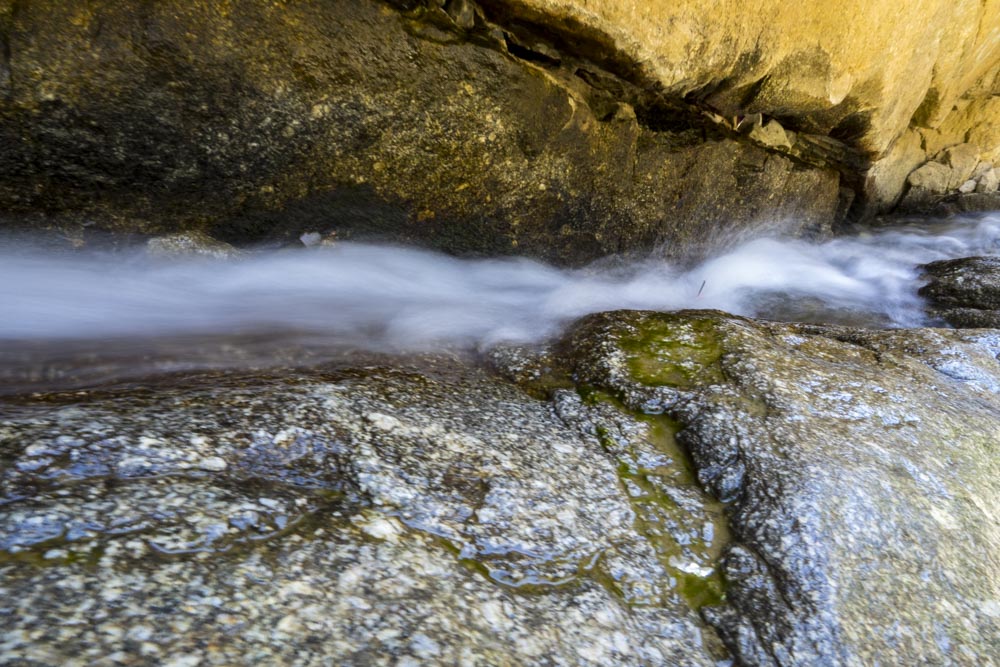
With long exposure times, movements can be blurred, which allows significantly more effects. You can turn lights into lines, just ignore moving objects in an image, or make water silky like in the picture. Decisive for the effect in the example is the length of the shutter speed 1 / 1.6 the secondary parameters Aperture F22 and ISO100 you can also set the automatic => shutter priority (Letter S or T=Time Value on Modewheel)
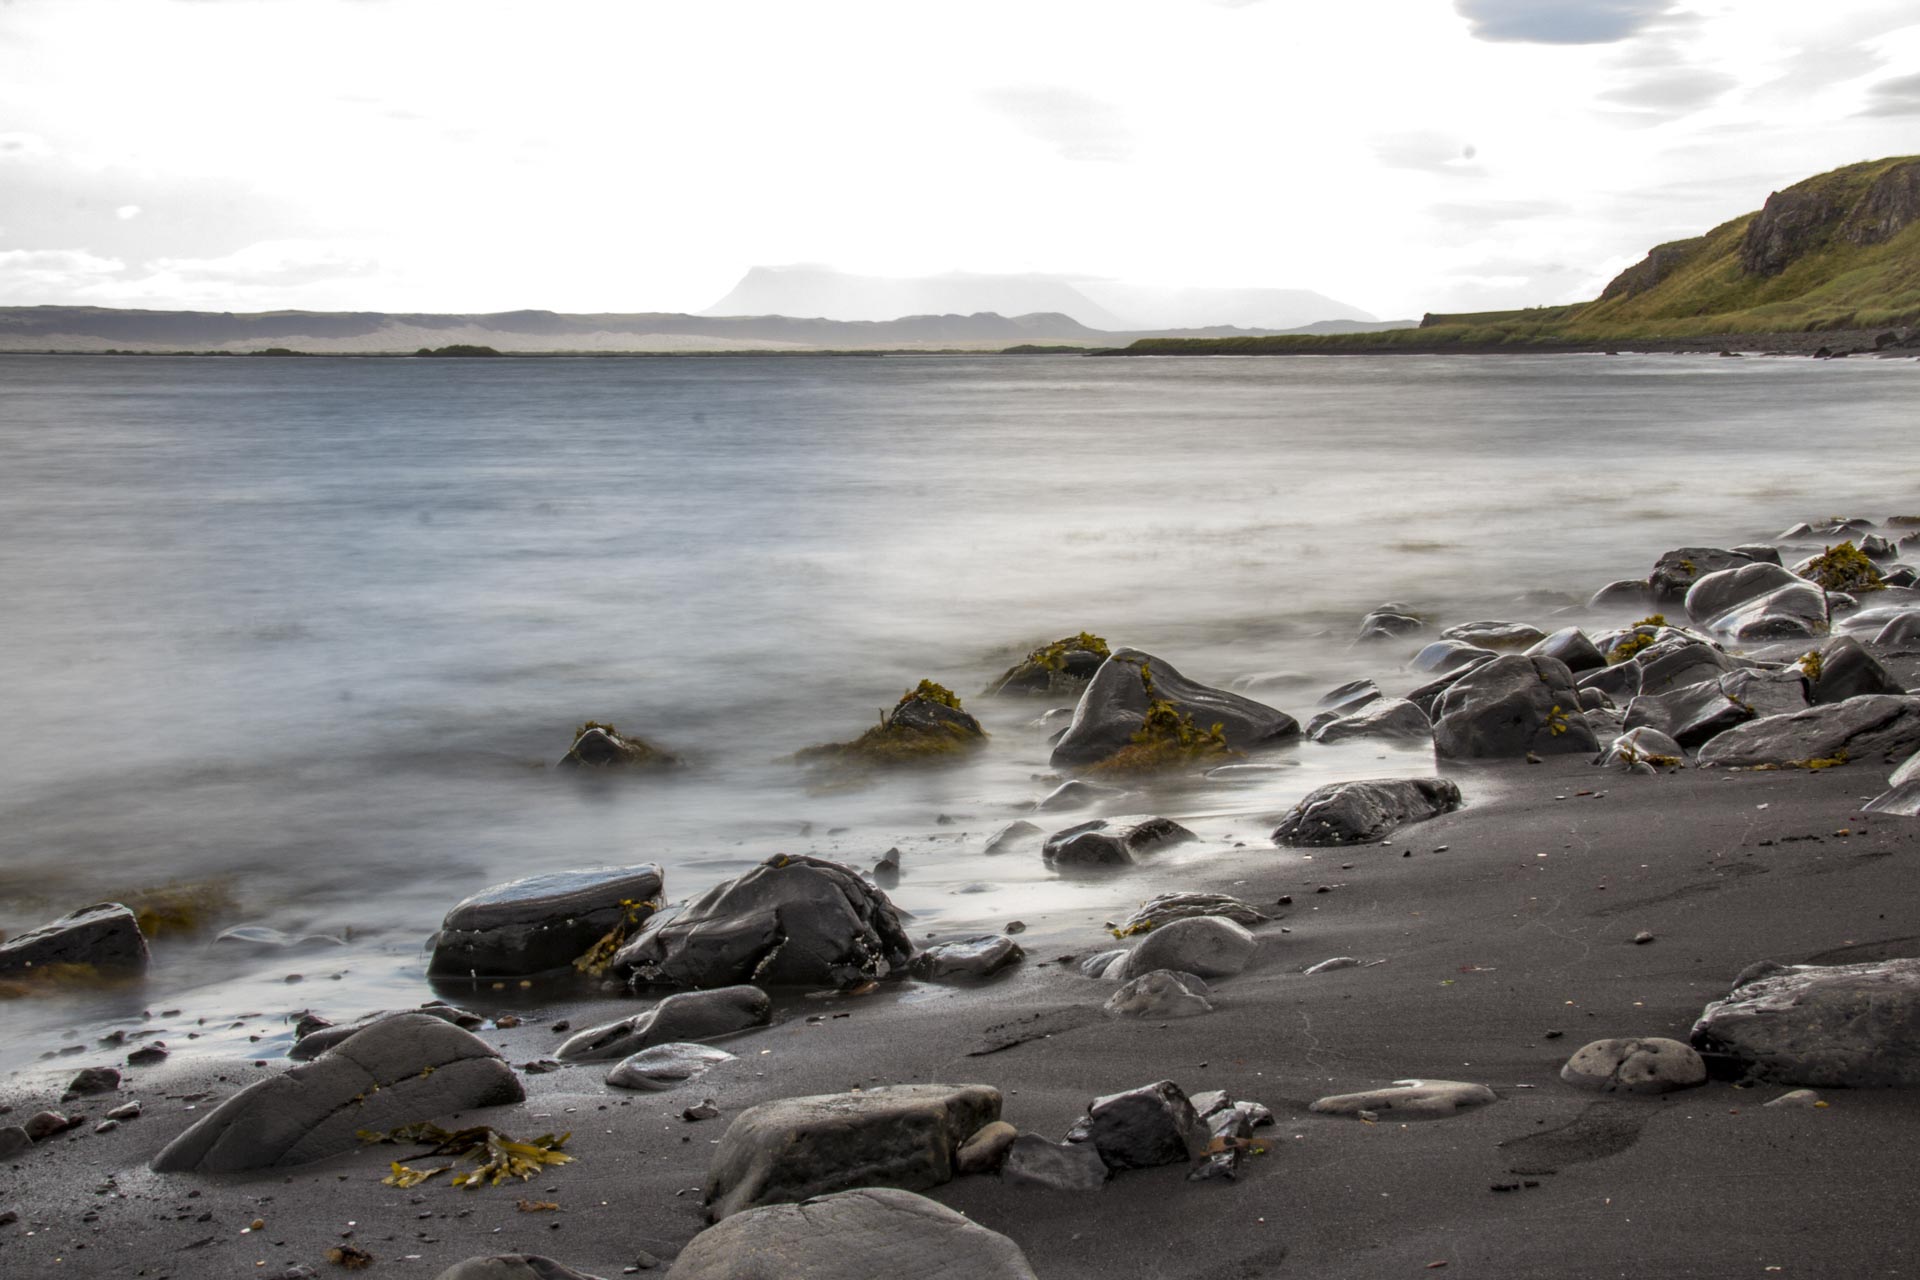
Long Exposure with ND-Filter
While the last example was done without tools, the next two used an ND filter. In principle, the filter is a pair of sunglasses for the camera and lets less light in. The filters are specified by the factor by which they extend the exposure time. With the parameters of the example exposure time 10s, aperture F22 and ISO100 I probably used an ND64 filter. That means the shutter speed is increased 64 times.
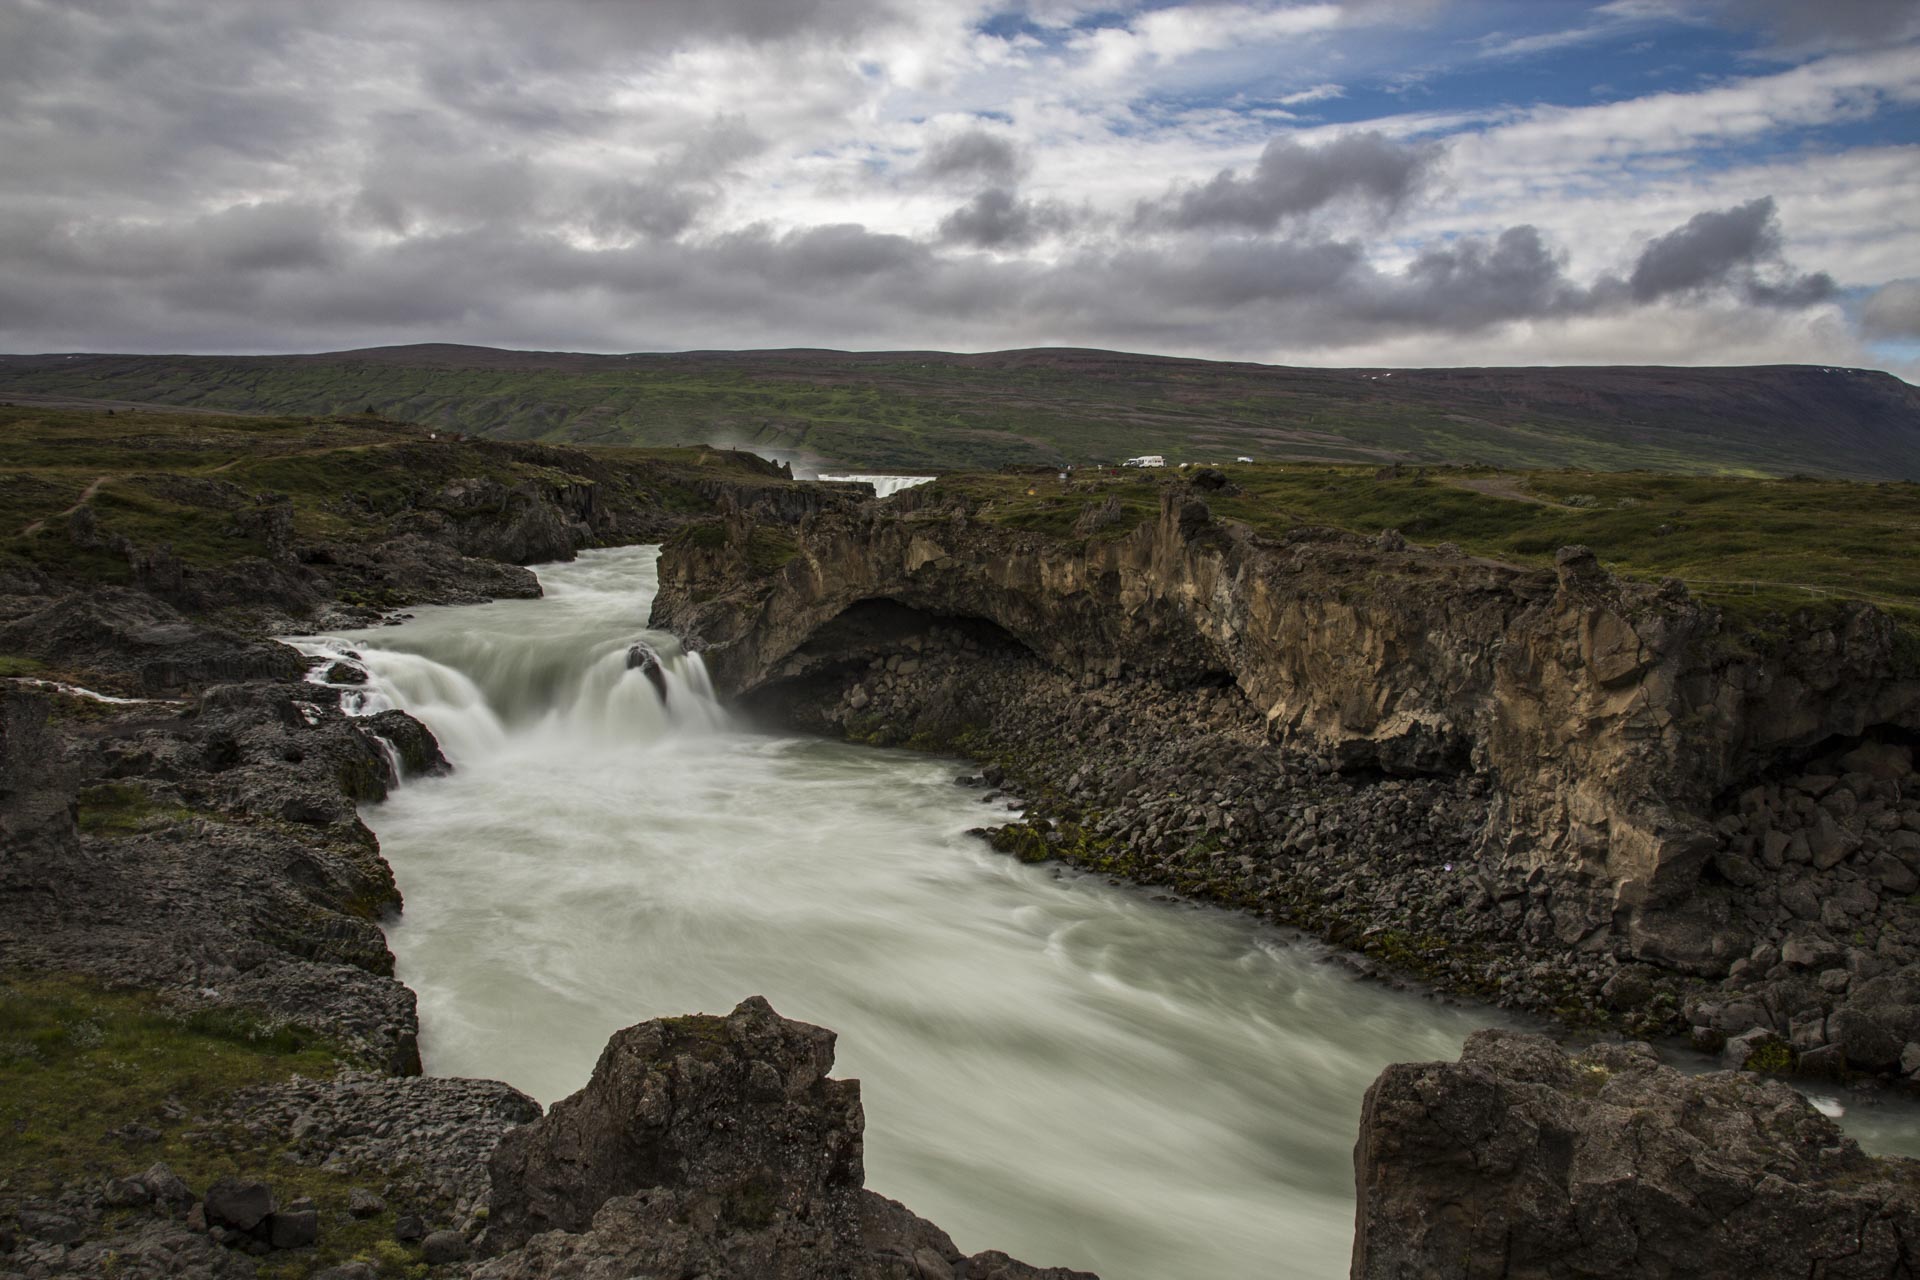
Long Exposure with ND-Filter
Of course, the tripod tool understands itself at such long exposure times. Often you can also place the camera somewhere directly and stabilize instead of the popular “bean bag” with luggage (clothing, camera straps, etc.). With the parameters of the example shutter speed 2s, aperture F13 and ISO100 I probably used an ND8 filter. That increased the exposure time 8 times.
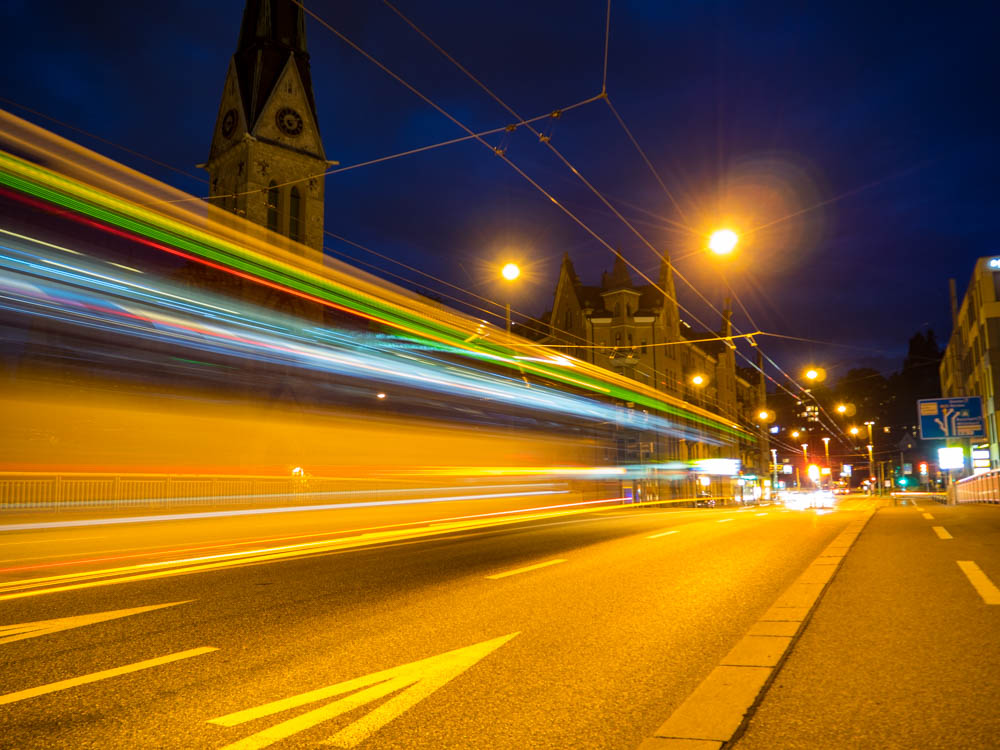
Long Exposure at Night
What is normally the enemy of the photographer is now his friend, the darkness. Except tripod you need no tools to make these pictures. For passing objects like this bus but you need good luck and practice to set the parameters correctly. The speed of movement is critical to the length of the exposure time. In the example, the parameters are shutter speed 2.5s, aperture F3.5 and ISO100

Long Exposure at Night
Of course, if you can influence the speed of the movement or repeat the movement, the parameterization will be easier. But in a group it’s also more fun. You can create the same effect with any light source. In the example, the parameters are shutter speed 4s, f-stop F4 and ISO400
Post-processing is only needed if you are not able to take pictures, it falsifies reality and takes a lot of time. There are many arguments against post-processing but the fact is that it is completely normal among professionals. Also in the days of analog photography, with different developmental methods, e.g. chemically reworked. There are situations that can never be ideally or only ideally accommodated with tools. Examples are mixed light situations with Flash and lighting, differences in light between sky and landscape, the sun shining through between the objects. Lens and sensor can become dirty and you can’t always clean them immediately. It is also a pity if due to small mistakes like a slated horizon an otherwise good picture is gone. When you look at it for the second time, you often get a new image detail. It is worthwhile to deal with the topic. With specialized tools such as Adobe Lightroom it does not take that too long.
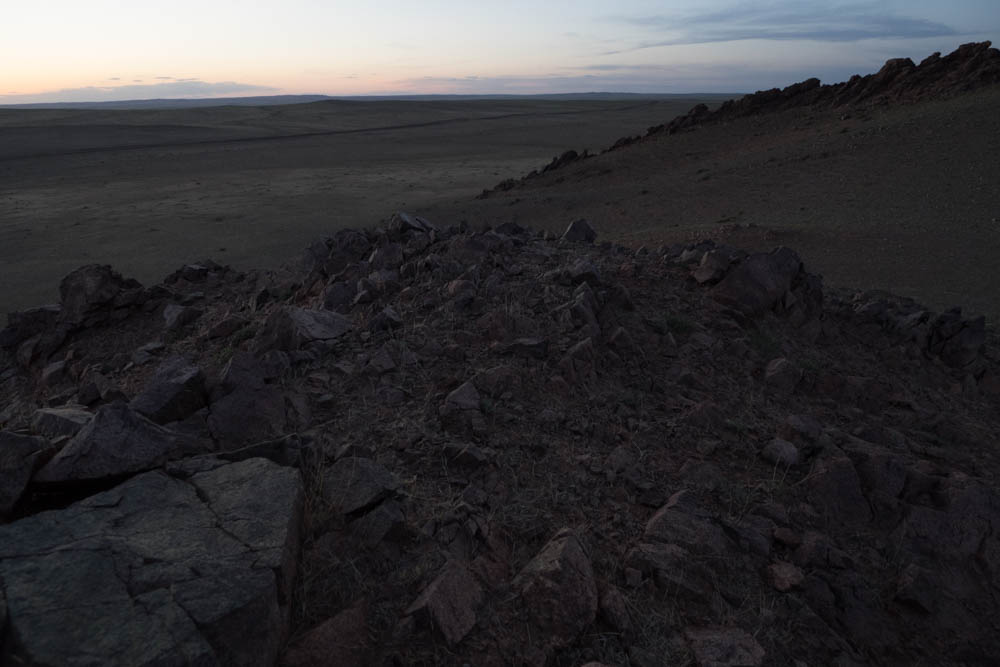
Unfavorable Light Conditions
About the exposure correction was prevented that the sky was completely overexposed. The color spectrum of the sunset could not be properly recorded because then the foreground would have been underexposed. In such situations you can also use gray gradient filters when recording. The horizon is darkened by the filter and the exposure becomes more homogeneous.
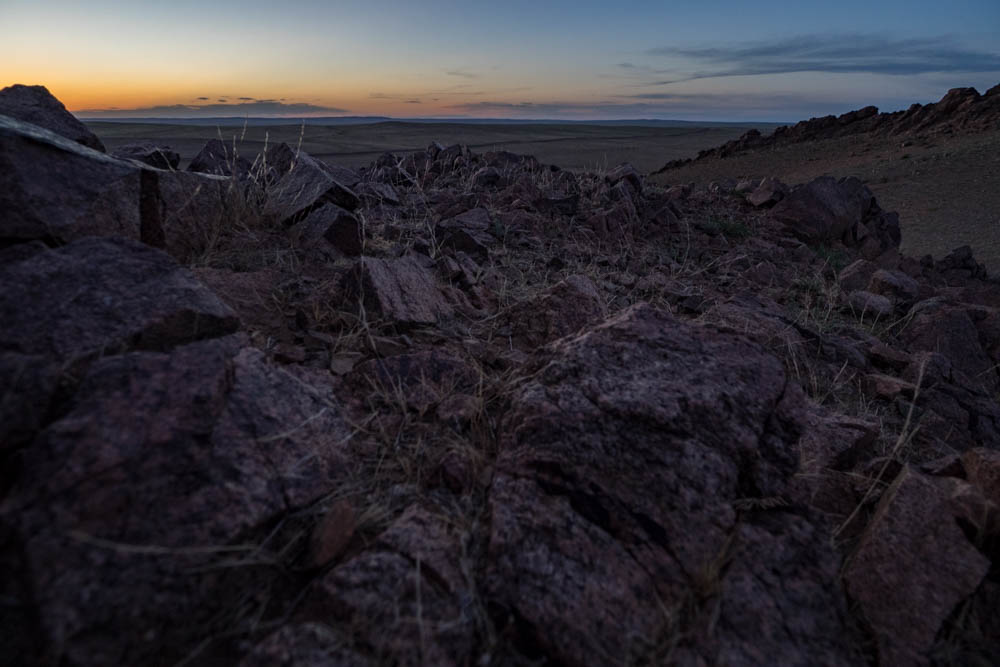
Unfavorable Light Conditions
In the post-processing you can darken the lights and lighten the depths. Basically, overexposed areas are worse than underexposed areas because they are only white. Underexposed areas tend to be noisy and are rarely black completely.
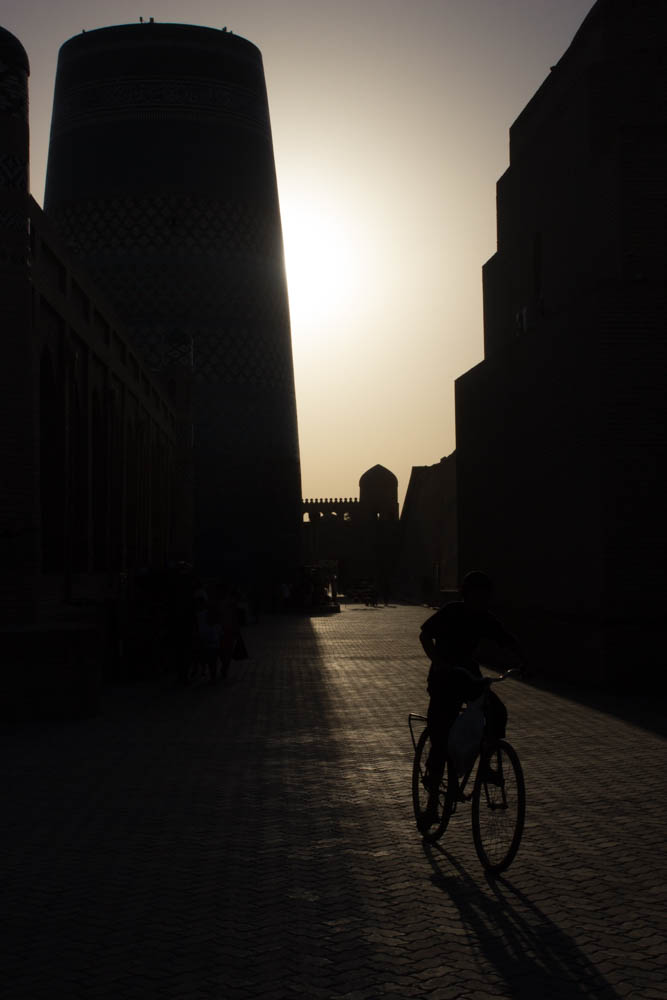
Unfavorable Light Conditions
Photographing directly against the sun almost never leads to good results without editing. Exposure compensation is a compromise here. It is impossible not to overexpose the sun itself. Nevertheless, you should turn down the exposure correction so far that it takes the form of the smallest possible circle without underexposing the dark areas. Cate did a great job with this picture.
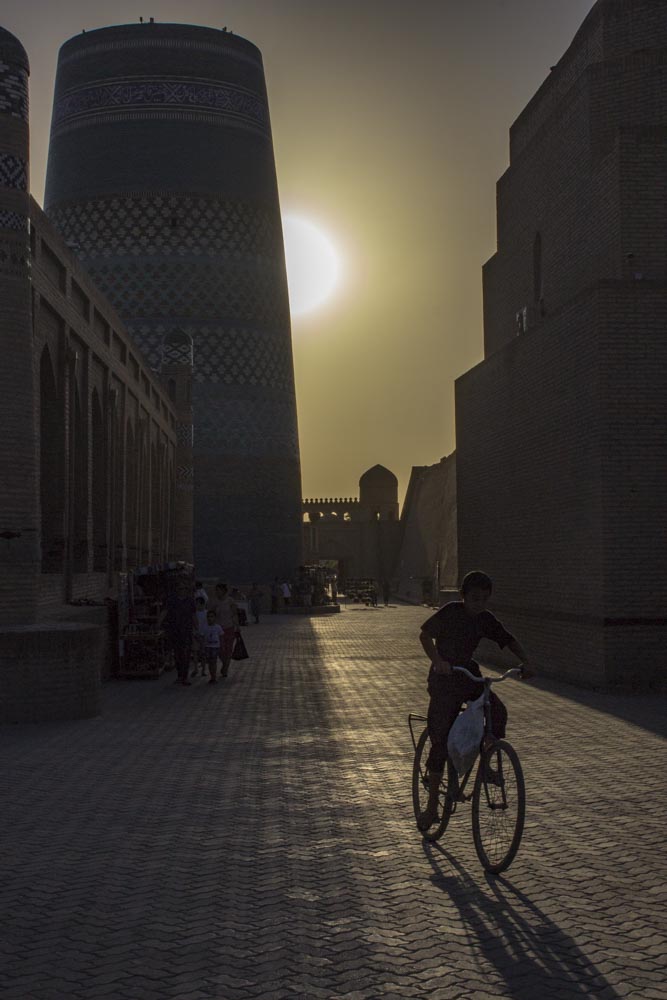
Unfavorable Light Conditions
Only in the post-processing you can see why she has made the picture at all. A beautiful scene, that would probably never have been reached with classical means like filters or flash.
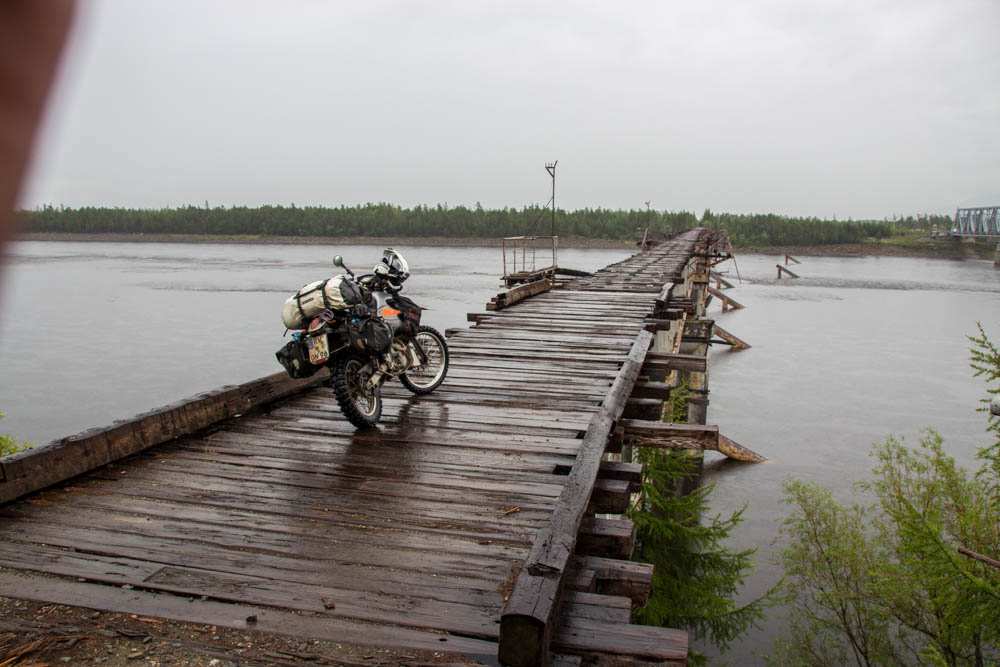
Wrong Image Detail
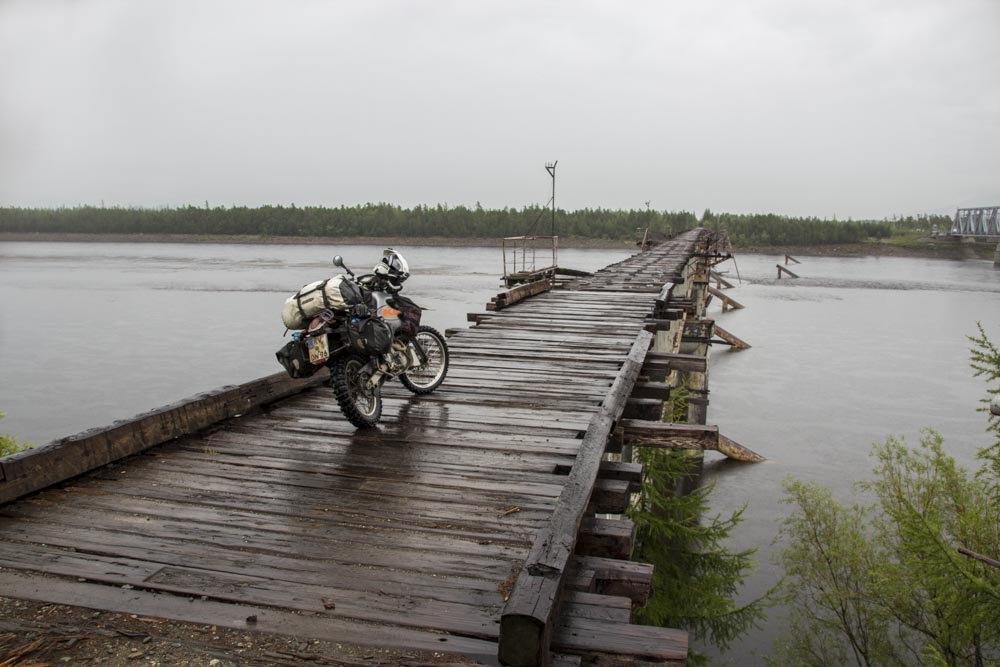
It happens extremely fast that you choose an image detail wrong if you shoot hectic like in the example photo.
Wrong Image Detail
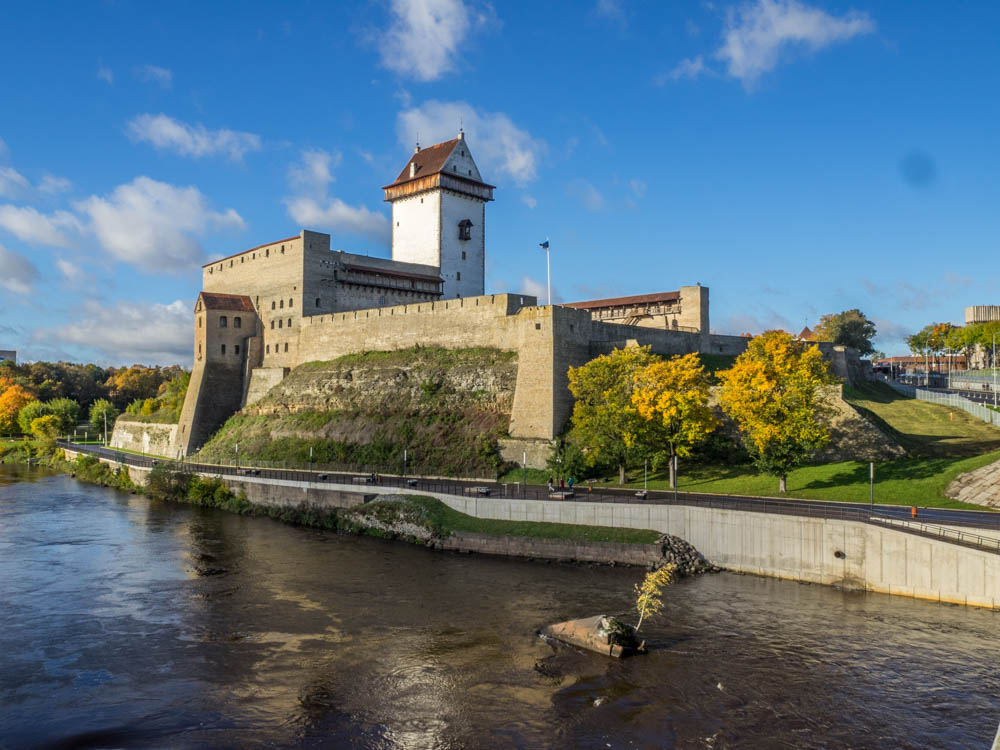
Although it is not the ideal frame for the sake of image quality, but it is still a great photo, after all.
Dirt
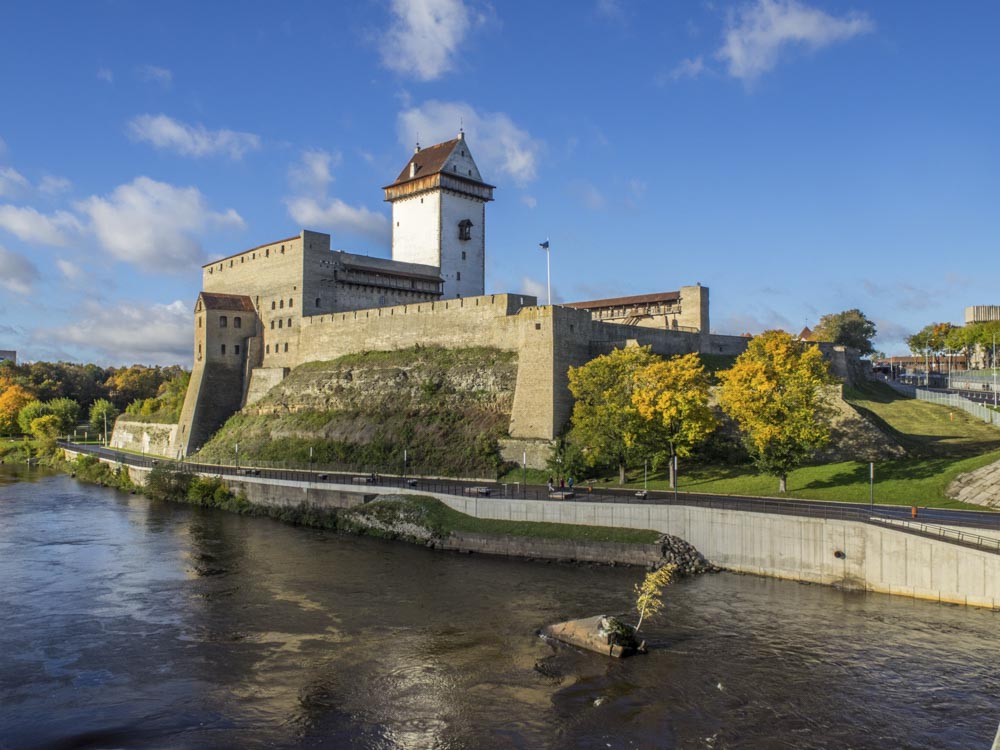
During my whole Baltic Sea tour I had dirt on the image sensor. For me a completely new problem and I had accordingly nothing to clean the sensor and also no idea how to do that. The ugly point on the top right of the picture can also be easily removed in post-production.
Dirt
There are special repair brushes or the classic copying stamp. The less pattern the affected area has the easier. If the area is heavily patterned, however, such errors also occur less frequently.
White balance
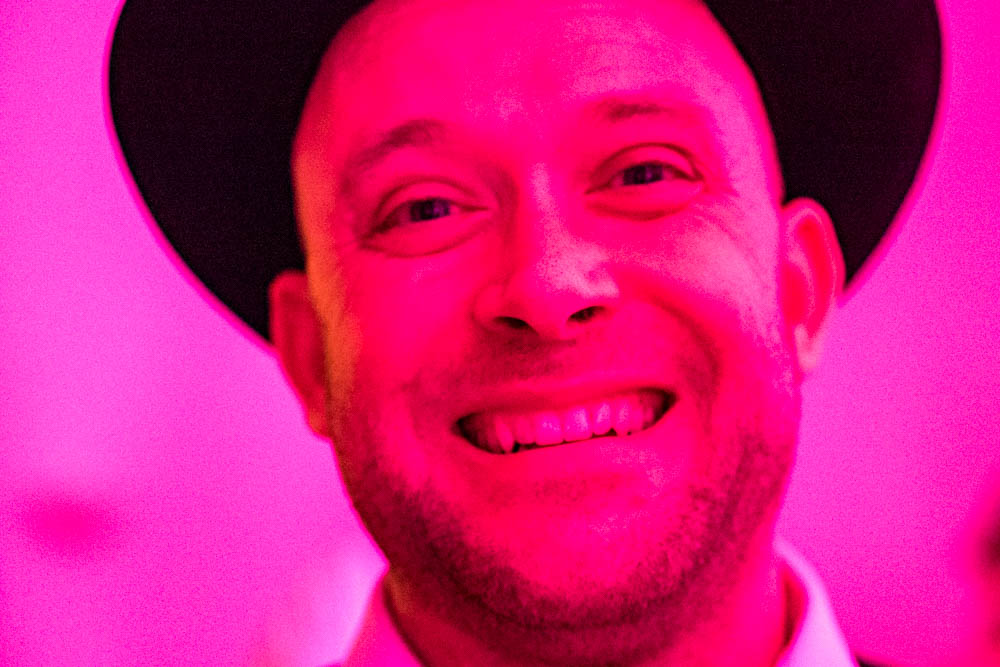
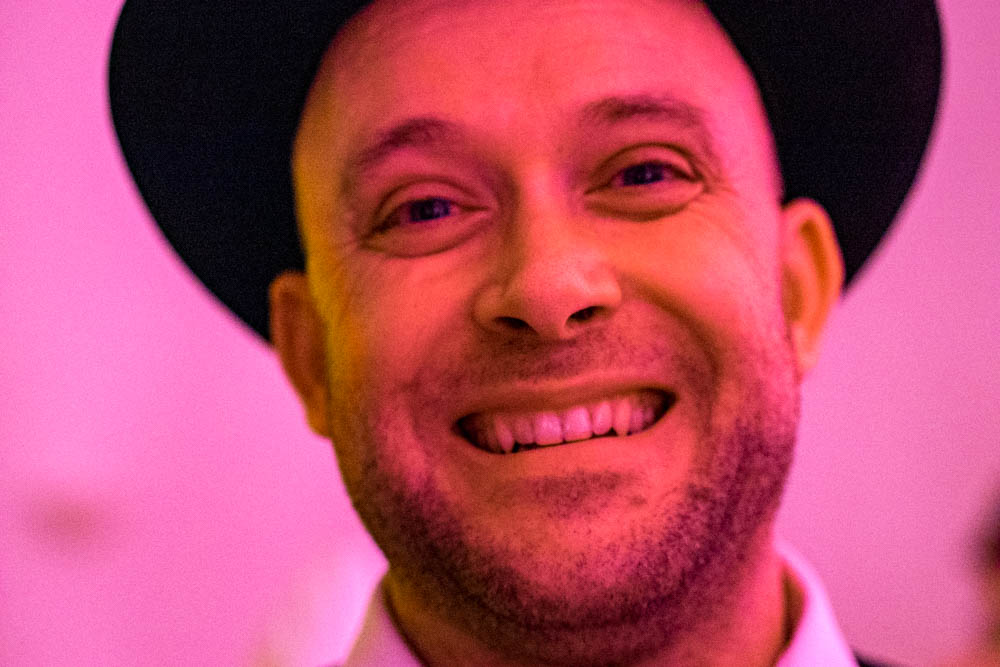
As beautiful as colorful party lighting is to photograph it is a horror. Of course, you would have been able to check the setting before each picture with a white balance card, but how many great pictures would you have missed in that time?
White Balance
With something trying the white balance may not be 100% perfect but at least the colors look reasonably natural again.
There are many other examples of common solvable problems including Chromatic Aberration or Red Eyes. The list should not be complete it should give an impression what is possible and which issues can be solved. Anyway, the most important aspect in my eyes remains the associated self-reflection and thus the progress in the image design. If you feel like working on postprocessing, you should first change your camera settings so that the pictures are saved in the respective RAW format. It is possible with JPEG too, but the possibilities are very limited. Concerning the software, I have tried nothing else then Lightroom and can therefore say little to the alternatives. With the search term “Lightroom alternatives” you will certainly find better advice. The operation is easy to learn and there are countless tutorials for every case on Youtube. Maybe this is followed by a video later on how I typically edit my pictures.


Leave a Reply